 I just wanted to stop in and wish everyone a Happy Holiday. Like you I have been knee deep in a "to do" list. But, I thought it would be nice to give you a sneak peek at the topper for a special cake I am making for my neice. It is to be delivered on Christmas Eve two states away! I can, I can, I can, I know I can (I hope)!
Anyway enjoy your holiday, stay safe and stay tuned for more on "the cake"!
I just wanted to stop in and wish everyone a Happy Holiday. Like you I have been knee deep in a "to do" list. But, I thought it would be nice to give you a sneak peek at the topper for a special cake I am making for my neice. It is to be delivered on Christmas Eve two states away! I can, I can, I can, I know I can (I hope)!
Anyway enjoy your holiday, stay safe and stay tuned for more on "the cake"!
Tuesday, December 21, 2010
Happy Holidays 2010!
I just wanted to stop in and wish everyone a Happy Holiday. Like you I have been knee deep in a "to do" list. But, I thought it would be nice to give you a sneak peek at the topper for a special cake I am making for my neice. It is to be delivered on Christmas Eve two states away! I can, I can, I can, I know I can (I hope)!
Anyway enjoy your holiday, stay safe and stay tuned for more on "the cake"!
Tuesday, December 7, 2010
Maple-Pecan Medjool Date Rugelach
This month the Avid Backer's Challenge was the Eastern European pastry called Rugelach.  Rugelach is one of my holiday staples so when the ABC Baking group invited me to bake along this month using a version by Flo Braker, I was thrilled. Although I have been making rugelach for many years now I was looking forward to this challenge for three reasons. First of all, I have never been totally happy with my dough recipe. Second, I have never made rugelach with a date filling. And last but not least I have never tried out any recipes by Flo Braker. Not suprisingly I accepted the challenge with an open yet excited mind. Let's see the results.

 Rugelach is one of my holiday staples so when the ABC Baking group invited me to bake along this month using a version by Flo Braker, I was thrilled. Although I have been making rugelach for many years now I was looking forward to this challenge for three reasons. First of all, I have never been totally happy with my dough recipe. Second, I have never made rugelach with a date filling. And last but not least I have never tried out any recipes by Flo Braker. Not suprisingly I accepted the challenge with an open yet excited mind. Let's see the results.
Rugelach is traditionally made with a cream cheese pastry dough and this version is no different. However, in the past the pastry dough I used was often quite sticky and seldom flaky no matter how careful I was measuring the ingredients. The instructions suggest using a food processor to mix all the ingredients which makes the blending of ingredients faster therefore the butter and cream cheese stays a little cooler. I found this version to be much less sticky and much more flaky. Yay!
 processor to mix all the ingredients which makes the blending of ingredients faster therefore the butter and cream cheese stays a little cooler. I found this version to be much less sticky and much more flaky. Yay!
There are many different fillings for rugelach. I typically us a layer of jam (apricot or raspberry), sprinkled with raisins or currants, walnuts, brown sugar and cinnamon. There are however many more fillings to choose from such as- chocolate filling, prune filling and this date version. Flo Braker uses a mixture of brown sugar, cinnamon, and maple syrup, with chopped pecans and quartered dates. Now if you know me you will expect my brain  to go into overdrive and make another filling using the same ingredients. Well, you would be correct. The picture above right is true to the recipe. The next photo on the left will show a second version. For this version of filling I will share my recipe.
 to go into overdrive and make another filling using the same ingredients. Well, you would be correct. The picture above right is true to the recipe. The next photo on the left will show a second version. For this version of filling I will share my recipe.
Ingredients:
7 oz dried pitted dated; chopped
1/3 cup sugar
1/2 cup orange juice
1 tsp zest of orange
1/8 tsp cinnamon
Place all ingredients in a saucepan. Bring to a boil, reduce to a simmer and cook for 10 minutes, until most of the liquid is absorbed. Put mixture in a processor and puree. Set aside to cool.
The usual procedure for assembling the rugelach is to roll out a portion of the dough into a 8" circle. Cut into 12 pie-like sections. For Flo's version the wedges are brushed with maple syrup, sprinkled with brown sugar, and chopped pecans. A section of date is place at the top and the wedge is rolled. For my alternate version I brushed with the maple syrup, spread the pureed dates over the section, sprinkled with chopped pecans and rolled. The cookies are then baked until golden brown. After the come out of the oven s glaze of powdered sugar, maple syrup and hot water is brushed over the tops. They are then dipped into chopped pecans. Allow the cookies to cool completely.

I happily found Flo Braker's version of the cream cheese pastry to be more flaky and delicious than the version I have been using. The date filling no matter which version you choose are both heavenly. I had two volunteer tasters that replied only with big smiles and gentle moans. I found Flo Brakers recipe to be supreme! I will replace my old stand-by for this version when preparing this season's holiday rugelach.
If you have the opportunity to bake Rugelach don't miss it.
Tuesday, November 30, 2010
The Daring Bakers Crostata
The 2010 November Daring Bakers' challenge was hosted by Simona of briciole. She chose to challenge Daring Bakers' to make pasta frolla for a crostata. She used her own experience as a source, as well as information from Pellegrino Artusi's Science in the Kitchen and the Art of Eating Well.


As soon as I read through the challenge I was thrilled. I make tarts often for family and friends and they are always met with big smiles. For this go around I couldn't decide if I wanted to use fruit or pastry cream so I figured I would make them as tartlets and prepare both! Good idea, right?
Simona provided two versions of pasta frolla to choose from so I chose the nut-free version for "J". The ingredients similiar to a pate sucree with the inclusion of lemon zest was a breeze to prepare and could easily be made ahead.
The filling choices were fruit preserves, pastry cream or any other of our choice!
The first filling I prepared was a small batch of pear compote:
Ingredients:
375 grams pears peeled, halved, cored, cut into 1/2" cubes
62 grams sugar
1tsp vanilla
50 ml of apriot brandy or water
1tsp lemon juice
Place all ingredients in a saucepan. Cover with a parchment round with a vent hole, over low heat, cook stirring occasionally. The compote is finished when the pears are translucent and the liquid is evaporated. Set aside until needed.
The second filling I prepared was a small batch of vanilla pastry cream:
Ingredients:
1 cup milk
1/3 cups sugar
2 tbs corn starch
3 yolks
1 tbs butter, softened
1 tsp vanilla
1 tbs apricot brandy or liqueur
Combine 3/4 cup milk and the sugar in a medium saucepan. Stir to disolve the sugar, then place over medium heat and bring to a boil. Pour remaining milk into a 1 qt bowl and whisk in the corn  starch, then yolks. Temper 1/3 of the hot milk mixture into the egg mixture stirring constantly. Returm the remaining milk to medium heat and bring to a boil. With a hand whisk pour the egg mixture into the milk in a steady stream. The pastry cream will begin to thicken. Continue whisking until the pastry cream comes to a boil, careful not to scorch the sides. Cook for 1 minute. Remove from the heat. Add the butter, vanilla, and brandy; whisk until smooth.
 starch, then yolks. Temper 1/3 of the hot milk mixture into the egg mixture stirring constantly. Returm the remaining milk to medium heat and bring to a boil. With a hand whisk pour the egg mixture into the milk in a steady stream. The pastry cream will begin to thicken. Continue whisking until the pastry cream comes to a boil, careful not to scorch the sides. Cook for 1 minute. Remove from the heat. Add the butter, vanilla, and brandy; whisk until smooth.
Pour into a bowl and cover with plastic directly on surface of cream so as not to form a skin. Set aside to cool.
After the pasta frolla has chilled it is ready to roll out and fill the desired pan. The filling is added and the final step is making a lattice top using the left over dough. A short stay in the oven and voila!
This was a welcome challenge and the timing was perfect for the holiday. Thank you Simona!
Wednesday, November 17, 2010
Butternut-scotch Pudding & Ginger Cake
I love the autumn; its colors, warm & spicy flavors, apples, wood fires, Halloween, Thanksgiving, and cool crisp air. It's a time when I like to experiment with new recipes before I get started on the holiday baking. Always looking for something new and special to share with family, friends and neighbors. This past weekend I tried out two new items: a pudding and a cake that looked so special I could hardly wait for them to cool before digging in. 

Pudding is not something I would go out of my way for until I saw this one. Butternut squash is one of my favorites, it is sweet on its own and can be used as a side dish in many forms, or as a soup. This is the first time I've come across a dessert recipe with butternut squash as the main attraction. It truly conveys "comfort" to me and is perfect for a crisp autumn day.
Adapted from Bron Marshall
Ingredients:
3/4 cup brown sugar
3 tbs corn starch
1 cup roasted butternut squash; pureed
2 cups half & half
pinch of salt
3 egg yolks
1 tsp vanilla
2 tbs butter
In a small bowl stir together the brown sugar and corn starch. In a medium bowl combine the squash, half & half, brown sugar mixture, pinch of salt, and egg yolk. Blend with an immersion blender (or do this in a blender) until smooth. Pass through a strainer into a medium saucepan.
Cook the mixture over medium heat whisking constantly until thick and bubbly. Lower heat and continue cooking a minute or two until thick but pourable. Pass through a strainer and add the vanilla and butter. Stir until the butter has melted. Cover the top with plastic directly on the surface to avoid a skin from forming. Refrigerate until cold. Easy!!
Gingerbread Cake, well doesn't that say spicy all on its own. Moist, tender crumb, warm or at room temperature it was calling me. And wouldn't this go well with the pudding?!!
Adapted from Tish Boyle

Ingredients:
3 cups flour
1 1/2 baking powder
1 tsp baking soda
2 tsp ground ginger
1 1/2 tsp cinnamon
1/2 tsp nutmeg
1/8 tsp ground cloves
1/2 tsp salt
10 tbs butter, softened
1 cup sugar
1 egg + 1 yolk
1/2 cup sour cream
1 tbs vanilla
1 tbs grated fresh ginger root
3/4 cup mild molasses
1 1/4 cup very hot water
Preheat oven to 325 degrees. Grease the bottom & sides of a 9" square baking pan, dust with flour.
Sift the dry ingredients into a bowl and set aside. Whisk to combine well.
In the bowl of a mixer, using the paddle attachemnt, beat the butter until creamy. Gradually add the sugar and beat until light, about 2 minutes. Beat in the egg and yolk one at a time, scraping down the sides as needed. Beat in the sour cream, vanilla and grated ginger. Add the molasses and beat for another minute. Add the dry ingredients at low speed, mixing just until blended. Carefully add the hot water and beat until smooth. Pour into the prepared pan. Bake 50-60 minutes until the toothpick comes out clean. Serve warm or at room temperature. Top with whipped cream if desired.
These two recipes we a good find. They are a perfect ending to a perfect autumn day. Hope you give them both a try!
Tuesday, November 16, 2010
Apple Upside-Down Cake
Whenever given a choice I use apples. Such a light, delicate, sweet, sometimes tart flavor. Never have I ever not liked  something made sweet or savory with apples. And then there are so many varieties to choose from! I have my favorites for pie, others for tarts, and still more for apple sauce and savory applications. This week the Heavenly Cake Bakers left the choosing to the bakers and of course it was Apple Upside-Down Cake for me. Since I am already late to post, without further delay lets dive into this gem.
 The next step is the cake batter. I can tell you straight out that with the inclusion of sour cream this batter was very smooth and that it was delicate, buttery, and had a small crumb.
 something made sweet or savory with apples. And then there are so many varieties to choose from! I have my favorites for pie, others for tarts, and still more for apple sauce and savory applications. This week the Heavenly Cake Bakers left the choosing to the bakers and of course it was Apple Upside-Down Cake for me. Since I am already late to post, without further delay lets dive into this gem.
The project breaks down into 2-3 components. The first being the bottom or shall I say the topping. Rose's recipe calls for brown sugar, lemon juice, butter, apples of course and walnuts (although I had to delete the nuts for "J"). All of the ingredients are mixed together save the butter and some of the brown sugar to mingle together and release some delicious juices. The butter and brown sugar are cooked together to make some caramel. The apples are arranged on the bottom of the cake pan with caramel and juices poured over the top. Simple as 1-2-3. As you can see however, I didn't quite get enough of the juices. I will have to change out the Cortland apples for a juicier variety next time. So make a note of this. I was not totally happy with using brown sugar in place of white sugar here either. I felt that the molasses over shadowed the apple a little. Next time I would use white sugar so that the apples shine through.
 The next step is the cake batter. I can tell you straight out that with the inclusion of sour cream this batter was very smooth and that it was delicate, buttery, and had a small crumb.
 The third component as you can see I omitted. It was a Bourbon flavored whipped cream garnish. Have to watch the waistline sometimes!
Overall all my tasters enjoyed this cake as did I. It was easy to like and went well with coffee and a glass of milk. I know I will do this cake again with the small changes I mentioned. Hope you give it a try too and let me know if you change the fruit.
Thursday, November 11, 2010
Sweet Potatoe & Date Cake with Caramel Sauce
There is something about dates that I simply can't resist. Maybe its the  intense sweet, or perhaps the sticky, smooth texture. I'm not sure but, anytime I see a recipe that calls for dates I am surely going to try it. I spotted this recipe on Bron Marshall's blog several months ago and set it aside for just that moment when I could whip it up. Then when fellow blogger and fellow Heavenly Cake Baker, Haana mentioned that she too had a love for dates, I just knew I had to share this find, so here we go Haana!
 Pour the batter into the baking vessel of choice and smooth the top. Bake for 35-50 minutes, or until the skewer comes out clean.
 intense sweet, or perhaps the sticky, smooth texture. I'm not sure but, anytime I see a recipe that calls for dates I am surely going to try it. I spotted this recipe on Bron Marshall's blog several months ago and set it aside for just that moment when I could whip it up. Then when fellow blogger and fellow Heavenly Cake Baker, Haana mentioned that she too had a love for dates, I just knew I had to share this find, so here we go Haana!
Ingredients:
1 cup sweet potatoes; cooked & pureed until smooth
1 cup dried dates; pitted & chopped
3/4 cup brown sugar
3/4 cup boiling water
75grams soft butter
1 tsp baking soda
1tsp vanilla
2 eggs
1 1/2 cups flour, sifted
2 tsp baking powder
1/4 tsp cardamon
Line a 9" square cake pan with parchment or use a greased & floured muffin pan. Preheat oven to 356 degrees.
In a bowl place the chopped dates, brown sugar, boiling water, and butter. Let stand for at least 15 minutes while the butter melts and the dates swell.
Stir the date mixture and add the baking soda. Stir to combine, the mixture should foam up. Add the sweet potatoe, eggs, and vanilla. Fold in the flour, cardamon, and baking powder.
 Pour the batter into the baking vessel of choice and smooth the top. Bake for 35-50 minutes, or until the skewer comes out clean.
Caramel Sauce (optional):
3/4 cup sugar
3/4 cup cream
pinch of salt
In a clean dry saucepan place the sugar and heat over medium heat until it begins to melt. Gently swirl the pan to get even color. As soon as it is golden remove from the heat and carefully add the cream. Be cautious, it will bubble up and release alot of steam at the beginning. Stir carefully. Add the salt and let stand until it cools.
Pour it over the cake and allow to soak in. I found this to be wonderfully moist, flavorful, soft,and not overly sweet in spite of the carmel sauce. The dates are soft, sticky and oh so marvelous. Hope you give it a try and enjoy it as much as I did!
Monday, November 8, 2010
Swedish Pear & Almond Cream Cake Rerun
When I saw that this weeks project with the Heavenly Cake  Bakers was the Swedish Pear & Almond Cream Cake that I did in error on May 31th I was glad. Since this is a wonderful multi-purpose cake as is I couldn't help but wonder how it would taste if I changed the fruit. Having this opportunity to bake it again I thought instead of pears I would try apples. This recipe is set up in the usual easy to follow multi component format that I love so much. So let us get going.
 The batter is spread in a greased and floured bundt pan. A 1/2" depression is made around the middle of the batter where the almond paste is spooned. Top the with the thinly sliced pears or apples and it is ready to bake.
 Bakers was the Swedish Pear & Almond Cream Cake that I did in error on May 31th I was glad. Since this is a wonderful multi-purpose cake as is I couldn't help but wonder how it would taste if I changed the fruit. Having this opportunity to bake it again I thought instead of pears I would try apples. This recipe is set up in the usual easy to follow multi component format that I love so much. So let us get going.
The first component to prepare is the almond cream. Almond cream is one of those mixtures that can and should be tried out different ways. I use it as a middle layer in apple, pear, and blueberry tarts or tartlets, as a spread on brioche (just spread and brown under a broiler), and now as a component of a "coffee" cake. It is simply a mixture of almond paste, sugar, butter, flour (or cornstarch), egg, and vanilla (of course). All ingredients go together quickly in a food processor and can be frozen (up to a month) for later use or stored in the refrigerator for 1 week.
The next component to prepare is the batter. This batter contains sour cream (ooooh the promise of a creamy smooth batter), cake flour (ahhh, delicate crumb), butter, sugar, vanilla, egg, and the leavenings. And lets not forget the pears (or shall I say apples in this run) sliced thinly and sprinkled with lemon juice.
 The batter is spread in a greased and floured bundt pan. A 1/2" depression is made around the middle of the batter where the almond paste is spooned. Top the with the thinly sliced pears or apples and it is ready to bake.
There is two things I learned from this rerun. The first is that while some batches of cakes or cookies can be cut in half and baked in smaller pans, this is not one of them. Although the finished cake was still delicate, light, small crumb and wonderful in its vanilla-apple flavor, I was left with the desire for more. More cake that is- the piece was just too short! Therefore, I would not reccomend cutting the batch size but rather go for a SLIGHTLY smaller pan for a higher cake. The other thing I learned was- pears or apples this is a wonderful addition to anyones favorites list.
Hope you enjoyed!
P.S.- I would also consider some cinnamon if I was to do the apple again :)
Monday, November 1, 2010
The Bostini
The very moment I laid eyes on the Bostini I couldn't wait to make it. What  can be better than an orange chiffon cake sitting in vanilla bean pastry cream sauce with chocolate glaze spilling ovr the top? I for one could think of nothing (at the moment that is). Well, this week the Heavenly Cake Bakers all set out to do this project. I can't wait to surf around to my fellow bakers blogs to see the various results. So, without further delay lets break this one down into 3 components; the cake, pastry cream, and glaze and get going.

 can be better than an orange chiffon cake sitting in vanilla bean pastry cream sauce with chocolate glaze spilling ovr the top? I for one could think of nothing (at the moment that is). Well, this week the Heavenly Cake Bakers all set out to do this project. I can't wait to surf around to my fellow bakers blogs to see the various results. So, without further delay lets break this one down into 3 components; the cake, pastry cream, and glaze and get going.
The cake derives it wonderful orange flavor from fresh orange zest and fresh squeezed orange juice, The tender crumb is due to the cake flour I am sure. And the ethereal texture of this wonderful cake is certainly due to the meringue that is carefully blended into the batter. I was very pleased with the results of this cake from start to finish. No dryness with this cake.
The vanilla bean pastry cream sauce was the next component to be prepared. Made from milk, yolks and a single whole egg, vanilla bean (of course), sugar, salt and heavy cream. There is nothing not to like about this pastry cream. Simple to prepare, creamy texture, and unbelievable vanilla flavor.

My family are not big fans of chocolate and I didn't want to over power the light flavors of the cake and cream, so I went very light on the chocolate glaze. It was easy to prepare with butter and chocolate. Slowly melted into each other and poured over the top before cooling.
The sight of this beautifully presented dessert had the whole family antsy to try it out. We were all delighted with the Bostini. The only draw back is that it was gone as soon as the photo shoot was done!!! Wednesday, October 27, 2010
Going Donuts with the Daring Bakers
The October 2010 Daring Bakers challenge was hosted by Lori of Butter Me Up. Lori chose to challenge DBers to  make donuts. She used several sources for her recipes including Alton Brown, Nancy Silverton, Kate Neumann and Epicurious. I don't know about everyone else out there but donuts just plain scared me. So this was truly a challenge for me.
 I must admit this challenge was fun and educational for me. Not only did it give me an opportunity to try something never before attemped but, I was able to take the fear out of deep frying. The donuts themselves were very tender and delicious! My family loved them and polished them off before they were totally cooled! Thanks Lori!!!
 make donuts. She used several sources for her recipes including Alton Brown, Nancy Silverton, Kate Neumann and Epicurious. I don't know about everyone else out there but donuts just plain scared me. So this was truly a challenge for me.
Lori gave us quite a number of choices (yeast or cake) and many variations (fillings and toppings) to choose from. Since this was to be my first attempt I chose to make yeast donuts with a coat of cinnamon and sugar. I know it doesn't sound very courageous, but the thought of deep frying without the help of a deep fryer had me very wary from the start.
T he ingredients and directions can be found on some of the Daring Bakers blogs if you want to give it a try. The yeast dough was suprisingly easy to assemble and rose nicely. If you have been reading my blog you would know that yeast used to send me running in the opposite direction. However, over time I have come to terms with it simply by making sure the water is at the correct temperature and that the yeast is fresh.
 he ingredients and directions can be found on some of the Daring Bakers blogs if you want to give it a try. The yeast dough was suprisingly easy to assemble and rose nicely. If you have been reading my blog you would know that yeast used to send me running in the opposite direction. However, over time I have come to terms with it simply by making sure the water is at the correct temperature and that the yeast is fresh.
Since I do not have a deep fryer I substituted a deep saucepan filled with oil to the required 3 inches. I used a thermometer and brought the oil to 365 degrees. The fry time was about 1 minute per side. I slid the cooked donuts out onto a rack and let them cool before rolling them in the cinnamon-sugar mixture.
 I must admit this challenge was fun and educational for me. Not only did it give me an opportunity to try something never before attemped but, I was able to take the fear out of deep frying. The donuts themselves were very tender and delicious! My family loved them and polished them off before they were totally cooled! Thanks Lori!!!
Monday, October 25, 2010
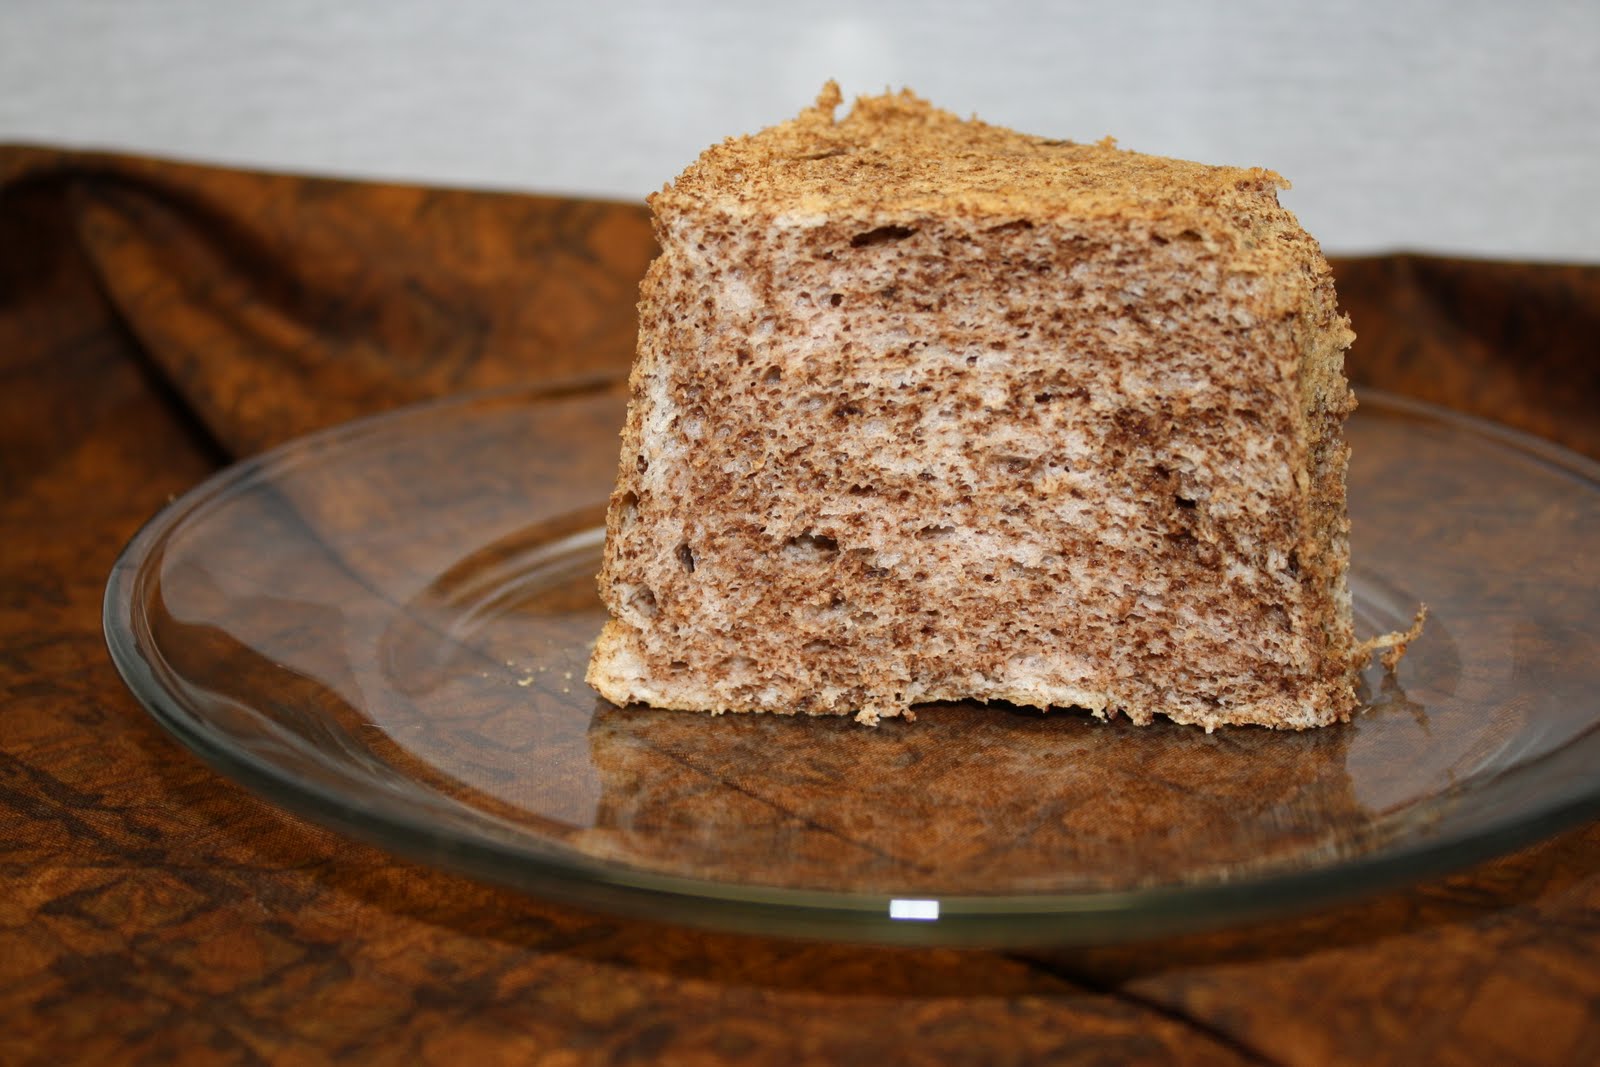
Chocolate Angel Food Cake
This week with the Heavenly Cake Bakers it was a Angel Food Cake  challenge. Challenge because even though the ingredients list is short and the directions seem easy, don't be fooled. The first few times I tried my hand at Angel Food I failed miserably. However, that was when my stubborn streak kicked in. I wasn't going to give in to something as light and feathery as an Angel Food Cake!
 Ingredients:
challenge. Challenge because even though the ingredients list is short and the directions seem easy, don't be fooled. The first few times I tried my hand at Angel Food I failed miserably. However, that was when my stubborn streak kicked in. I wasn't going to give in to something as light and feathery as an Angel Food Cake!
Soon after and many eggs later I realized the key to success with this type of cake is in the meringue. Yup, that would be the egg whites and sugar! And the key to success with meringue is in recognizing when the egg white is at the soft peak stage. Then and only then should the sugar be introduced in a slow and steady stream. After achieving success with your meringue the rest is a matter of following the authors directions. Rose Levy Beranbaum's version of Chocolate Angel Food Cake was easy to follow and.....well you'll see what we thought at the end, so read on.
 Ingredients:
superfine sugar (superfine is very important)
cake flour or Wondra flour (I used cake flour)
salt
egg white
cream of tarter
vanilla extract
grated chocolate (I used a semi-sweet)

Directions:
Whisk half the sugar, flour and salt together; set aside. In the bowl of a stand mixer using the whisk attachment, the egg whites and cream of tarter is beaten until soft peaks are foamed.
The balance of the sugar is gradually added with the mixer running on a medium-high speed. Continue beating until stiff peaks form.
Carefully and slowly fold in the dry ingredients. Then fold in the grated chocolate, again careful not to deflate the batter.
Empty the batter into a tube pan and bake on 350 degrees for 25-40 minutes. The last step to success is to turn the cake pan upside down for 1 1/2 hours to cool completely.
There are many ways to finish off an Angel Food Cake. You can simply dust with powdered sugar, drizzle with chocolate, top with ice cream and on and on. My family wanted it simply "as is" for their first taste. We found this cake to be moist, tender, and simply delicious. Perhaps tonight it should sit next to a scoop of ice cream!
Wednesday, October 20, 2010
Ginger Snaps with a snap!
 I didn't always like Ginger Snaps. I thought they were boring, no challenge, too simple. Then I started to yearn for and test out a Sauerbraten recipe. If you don't know what Sauerbraten is you are truly missing a treat. To put it simply, Sauerbraten is a pickled or sweet & sour pot roast. Don't wrinkle your nose at that description until you've had the pleasure of trying it. This is truly a yummy dish. Anyway, I'm not trying to convince you to try Sauerbraten today so lets continue. The gravy for this dish contains ground ginger snaps which lead me on a quest for the perfect ginger snap. I was looking for a punch of flavor, a little heat and a snap. This is what I found and tweeked to my version of perfection.
Ingredients:
9oz flour
2 tsp baking soda
2 tsp ground ginger
1/2 tsp allspice
1/4 tsp salt
1 stick butter; melted, cooled
1/4 cup molasses
1/2 cup sugar
1/3 cup brown sugar
2 tbs grated fresh ginger
1 egg
1/3 cup finely chopped crystallized ginger
1/2 cup sugar for rolling
 Directions:
In a medium bowl combine all dry ingredients; set aside. Combine warm butter, molasses, sugars, fresh ginger in mixer bowl. Mix on medium-high speed until light and fluffy. Add the dry ingredients and chopped ginger; blend just until incorporated. The dough will be soft and should be refrigerated for at least 1 hour. Form dough into 1" balls, roll into the sugar. Bake on a parchment lined baking pan 12-15 minutes in a 350 degree oven. If you like them crisp leave the dough in the refrigerator over night and bake 14-18 minutes. Cool completely on a rack.
Hope you enjoy these as much as we do!
Monday, October 18, 2010
Many-Splendored Quick Bread
 It was nice to bake a quick bread with the Heavenly Cake Bakers this week. Quick bread isn't something I would normally choose to bake but, the addition of carrot & zucchini made this one a little more interesting. The recipe presented in Rose's Heavenly Cakes book looked easy to do so I'll just get on with it.
The ingredients list was a little longer than usual but very nothing odd or hard to get. It included walnuts (for a gentle crunch), oatmeal (fiber-so maybe this is healthy?), banana (moist), oil (which means it will stay soft even straight out of the  refrigerator), brown sugar (mmmm, warm flavor), sugar, egg, zucchini, carrot (nice colors), flour, and the usual leavenings. The instructions called for toasting the walnuts which gaves this quick bread much needed flavor.
 refrigerator), brown sugar (mmmm, warm flavor), sugar, egg, zucchini, carrot (nice colors), flour, and the usual leavenings. The instructions called for toasting the walnuts which gaves this quick bread much needed flavor.
 After making the batter and baking I brushed the top with honey and sprinkled with a sugar-cinnamon mixture. Then allowing the bread to cool I sliced it up and popped a piece right into my mouth. I found the cake to be tender, moist, and colorful. However, I wish I had tasted the batter before baking I would have added some spices. I felt that there just wasn't enough flavor. But, then again if you were in the mood for something simple and not too sweet, this would be nice with tea or coffee.
 But, then again if you were in the mood for something simple and not too sweet, this would be nice with tea or coffee.
Wednesday, October 13, 2010

Monday, October 11, 2010
Apple Tart with an Almond Cream Center
Phew, what a week it has been! I have returned to reality after spending some quality time with and preparing for a visit from friends. Dale is my very special friend of 47 years! We grew up together, we each had ups and downs; good times and bad times, the births of our children, the loss of loved ones, and battles with cancer. Through it all we remained the best of friends. So this was a special visit from special people that deserved only the best of eats!
 some quality time with and preparing for a visit from friends. Dale is my very special friend of 47 years! We grew up together, we each had ups and downs; good times and bad times, the births of our children, the loss of loved ones, and battles with cancer. Through it all we remained the best of friends. So this was a special visit from special people that deserved only the best of eats!
The four of us (husbands included- after all they truly complete the "us") baked an Apple Tart, stage it for a photo op and took turns with the camera! Oh and I almost forgot- we ate it...what a bast! Ok, ok, I'm moving on to the yummy part. This tart has several components and is worth all the effort so hang in there. First is an Pate Sucree, then almond cream, an apple compote, and poached apples. So, lets get going!
Pate Sucree or Sweet Dough:
2 cups Flour
1/2 cup sugar
1/4 tsp salt
1/2 tsp baking powder
4 oz butter, cool, 1/2" cubes
2 eggs
Stir together dry ingredients. Add butter cubes; toss to coat. Using your impeccably clean hands rub the butter pieces into the flour. No visible pieces of butter should remain and it should have a sandy appearance. Beat the eggs and pour over the butter mixture. Stir with a fork until evenly moistened. Press together, shape into a flat disk. Wrap in plastic and chill. Remove from refrigerator and blind bake on 350 degrees for 15 minutes. Set aside.
 Remove from refrigerator and blind bake on 350 degrees for 15 minutes. Set aside.
Apple Compote: (sorry about the metrics)
375g peeled, cored, and 1/4"cubes, golden delicious apples
62g sugar
1/2 tsp vanilla
1 tsp lemon juice
50ml water or apple brandy
Place everthing in a saucepan.Cover, place over low heat, and cook, stirring occassionally. The compote is finished when the apples are translucent and the water is evaporated. Set aside.
Almond Cream:
125g butter
125g sugar
125g ground almonds or almond flour
1 egg + 1 yolk
15g corn starch
Add all ingredients to the bowl of a food processor and pulse until thoroughly combined.
Poached Apples:
3 Golden Delicious apples, sliced
1/4 cup sugar
1/4 cup apple brandy
Add all ingredients to a saute pan; cover. Poach just until the fruit has softened. Remove from liquid and set aside to cool.

Assembly:
Spread almond cream evenly over cooled shell. Top with the apple compote. Arrange the slices around the top. Sprinkle with sugar. Bake in a 375 degree oven for 35-40 minutes until the crust is brown and the apple slices are carmelized and tender. I usually brush the top with warm apple jelly to give it a nice shine and keep the apples from drying out.
I hope you have as much fun making and eating this as we did!
Friday, October 1, 2010
Orange Flower Scented Madelines
Madelines are a diverse, little shell-shape cakes. They are light and delicately flavored, great anytime of day. Madelines are elegant enough to place on the table at a dinner party, tea party, or family gathering. I love these little sweeties and make them in quite an assortment. Today though I flavored the Madelines with orange flower water. So lets get started.
 They are light and delicately flavored, great anytime of day. Madelines are elegant enough to place on the table at a dinner party, tea party, or family gathering. I love these little sweeties and make them in quite an assortment. Today though I flavored the Madelines with orange flower water. So lets get started.
This version is based on a recipe from one of my favorite cookbook authors, Nick Malgieri. The original can be found in "A Bakers Tour" (a great book I highly recommend).
Ingredients:
3/4 cup flour
1/2 tsp baking powder
2 eggs
1/2 cup sugar
2 tsp vanilla
1 tbs orange flower water
5 tbs butter, melted, and cooled

Directions:
In a small bowl, combine the flour and baking powder. Set aside.
In the mixer bowl, whisk the eggs until opaque. Then add the sugar in a stream. Whisk in the vanilla and flower water. Whip the mixture until light and fluffy, about 2-3 minutes.
Add the cooled butter slowly in a stream down the side of the bowl, while the mixer is running. Remove the bowl from the mixer and gently fold in the flour mixture.
Cover the bowl and place in the refrigerator until completely cooled or overnight.
When you are ready to bake the madelines, preheat the oven to 375 degrees. Butter a madeline pan well and chill while waiting for the oven to preheat. Spoon batter into the cavities about 3/4 full. Bake about 10 minutes, the madelines will be slightly golden on the edges and the hump will feel firm when touched gently. Remove from the pan from the oven and the madelines from the pan. Let them cool on a rack.
Madelines can be made in many ways some of which are: chocolate, pumpkin, lemon, vanilla, gingerbread, cinnamon, and on and on. Enjoy them with coffee, tea, milk, or on their own. Have fun with them, I hope you will love these as much as I do.
Wednesday, September 29, 2010

Monday, September 27, 2010
Decorated Sugar Cookies
 The September 2010 Daring Bakers' challenge was hosted by Mandy of "What the Fruitcake?!" Mandy challenged everyone to make Decorated Sugar Cookies based on recipes from Peggy Porchen and The Joy of Baking. "Oh yes!", was my first thought. I don't usually make sugar cookies and never have I ventured into decorating cookies with royal icing. Such a simple project yet a perfect chance to let the inner artist (raised eyebrow) take over.
Mandy requested only two things. First to use the Basic Sugar Cookie recipe provided and second that it must be in the theme of September. So first up is the sugar cookie; butter flour, superfine sugar, egg, and vanilla ( I added a touch of nutmeg to give them a little warmth to go along with the September theme). How easy is that! Yet this sugar cookie had just the right crunch (you know it's all about the crunch!) and lots of buttery goodness. I made the dough and froze it until I had the time to bake it off. The cookie dough was easy to roll out and didn't stick to the parchment (ahh, such a pleasure). After baking I froze the cookies until I had the opportunity to decorate.
 Royal icing from scratch (using egg whites instead of meringue powder) is another one of those things that I just not had the opportunity to try out. Royal icing is quick, easy, and actually tasty when almond extract is added to the powdered sugar, lemon juice and egg white. After getting this completed it was time for the best part, the decorating.
The first step before decorating the cookies is to plan it all out. What you want to cover with icing and what colors. Get it all set up and ready; that means bowls for mixing color, bags to hold the icing and tips on the bags. Then outline the area you plan on covering with the tinted royal icing. This creates a dam so to speak. Then thin the icing just a tad so that it will "flood" the area and look smooth. More planning than I originally thought but no worries.
This was really enjoyable and quite relaxing. I learned that first of all and probably most importantly that you cannot be in a rush. And that I need to use a smaller tip for the outline next time. Lastly to keep the outline neat because it shows. Although  my decorating wasn't as neat as I invisioned this was a fun project, thank you Mandy.
 my decorating wasn't as neat as I invisioned this was a fun project, thank you Mandy.
Friday, September 24, 2010
Orange Date Pinwheels
The date has been a staple in the Middle-East for thousands of years. The Ancient Egyptians used the date to make wine. It was regarded as a symbol of fertility. They can be eaten as they are or stuffed with nuts or candied fruit. Dates can be used in all types of baking, ice cream, made into wine, and vineagar. The sweet and creamy-like texture of this delectable fruit is one of my favorites. Today in preparation for the visit of a special friend I am making Orange Date Pinwheel. Lets get started!


Filling
10oz of pitted dates chopped
2/3 cup orange juice
3 tbs light brown sugar
1/4 tsp cinnamon
Combine dates, orange juice, brown sugar and cinnamon in a medium saucepan and place over medium heat. Simmer, stirring often for 5-6 minutes until the liquid is absorbed. Remove from heat, cover and let cool. Place in food chopper or food processor and pulse until smooth. Cover and set aside.
Dough
3 1/3 cups flour
3/4 tsp baking powder
1/4 tsp salt
1/4 tsp cinnamon
3/4 cup butter, room temperature

2/3 cups sugar
2/3 cup light brown sugar
2 eggs
1 tsp vanilla
1 tsp orange zest
Stir together dry ingredients. Place butter in a the mixer bowl and beat until light. Add sugars, eggs, and vanilla, zest, and beat until smooth. Beat until fluffy and well blended. Gradually add the dry ingredients mixing just until incorporated. Wrap dough in plastic and place in refrigerator to chill at least1 1/2 hours or overnight.
To form the pinwheels, roll the dough out on a lightly floured surface into a 12" x 18" rectangle. Spread filling evenly over the surface. Working from the longer end roll up jelly roll style to form a 24" log. Wrap in plastic and chill at least 2 hours. Yes, chill it's worth the extra time.
 Preheat oven to 350 degrees. Line cookie sheets with parchment. Using a shap knife slice 1/4" slices from the log. Bake 13-15 minutes until the edges are golden. Remove from oven and cool completely. Keep them in an airtight container no longer than a week or freeze for longer storage. You can substitute drien plums for the dates, they are just as delicious. I hope you enjoy these as much as we do!
 Preheat oven to 350 degrees. Line cookie sheets with parchment. Using a shap knife slice 1/4" slices from the log. Bake 13-15 minutes until the edges are golden. Remove from oven and cool completely. Keep them in an airtight container no longer than a week or freeze for longer storage. You can substitute drien plums for the dates, they are just as delicious. I hope you enjoy these as much as we do!
Wednesday, September 22, 2010
Ice Cream Roll + a recipe!
I've been a little remiss in my posting lately and I feel terrible about it. It's not that I let my life get in the way or that I haven't baked....really. Quite the opposite actually. I've been baking up a storm testing some recipes for an adult pastry class I teach and entertaining house guests. So you know there has been plenty around to photograph. Yet it is disappearing faster than I can set up and snap a photo! So anyway, I made this delicious ice cream roll cake and hide two slices just for you, awww.

This recipe is one of my stand bys and it is one of my most requested. It is easy, versitale, and very forgiving. So lets get down to it.

Ingredients:
1 cup cake flour
1/4 cup cocoa
1 tsp baking powder
1/4 tsp salt
3 eggs
1 cup sugar
1/3 cup water
1 tsp vanilla
1/2 gal ice cream (any flavor homemade or store bought)
Heat oven to 375 degrees. Line a jelly roll pan 15x10x1 (approx) with parchment and coat lightly with butter or non-stick spray. Stir together flour, cocoa, baking powder, and salt; set aside.
In a mixer bowl, with the whisk attachment beat the eggs about 5 minutes or until thick and lemon colored. Gradually beat in the sugar. Lower the speed, blend in the water and the vanilla. Gradually add the dry ingredients, beating just until the batter is smooth.
Pour into the pan and spread to the corners. Bake 12-15 minutes or until wooden pick inserted in the center comes out clean. Loosen the cake from the edges; invert on clean piece of parchment sprinkled with powdered sugar. Carefully remove the original parchment. While the cake is still hot, roll cake from narrow end. Cool on wire rack.

Remove ice cream from freezer and place on your counter for 10 minutes then proceed. Unroll cake carefully and spread softened ice cream over cake leaving 2" of the edge opposite you without ice cream. Re-roll cake, wrap with plastic, place in freezer to set up at least 3 hours.
Dust top with powdered sugar before serving.
Remember I said this is versatile. That means change the ice cream flavors, or fill it with a layer of cut up fruit and whipped cream or just whipped cream. If you want a yellow cake just substitute the 1/4 cup of cocoa for 1/4 cup more of cake flour.
Have fun and enjoy!

Wednesday, September 15, 2010

Monday, September 13, 2010
Free Choice- Lemon Meringue Cake
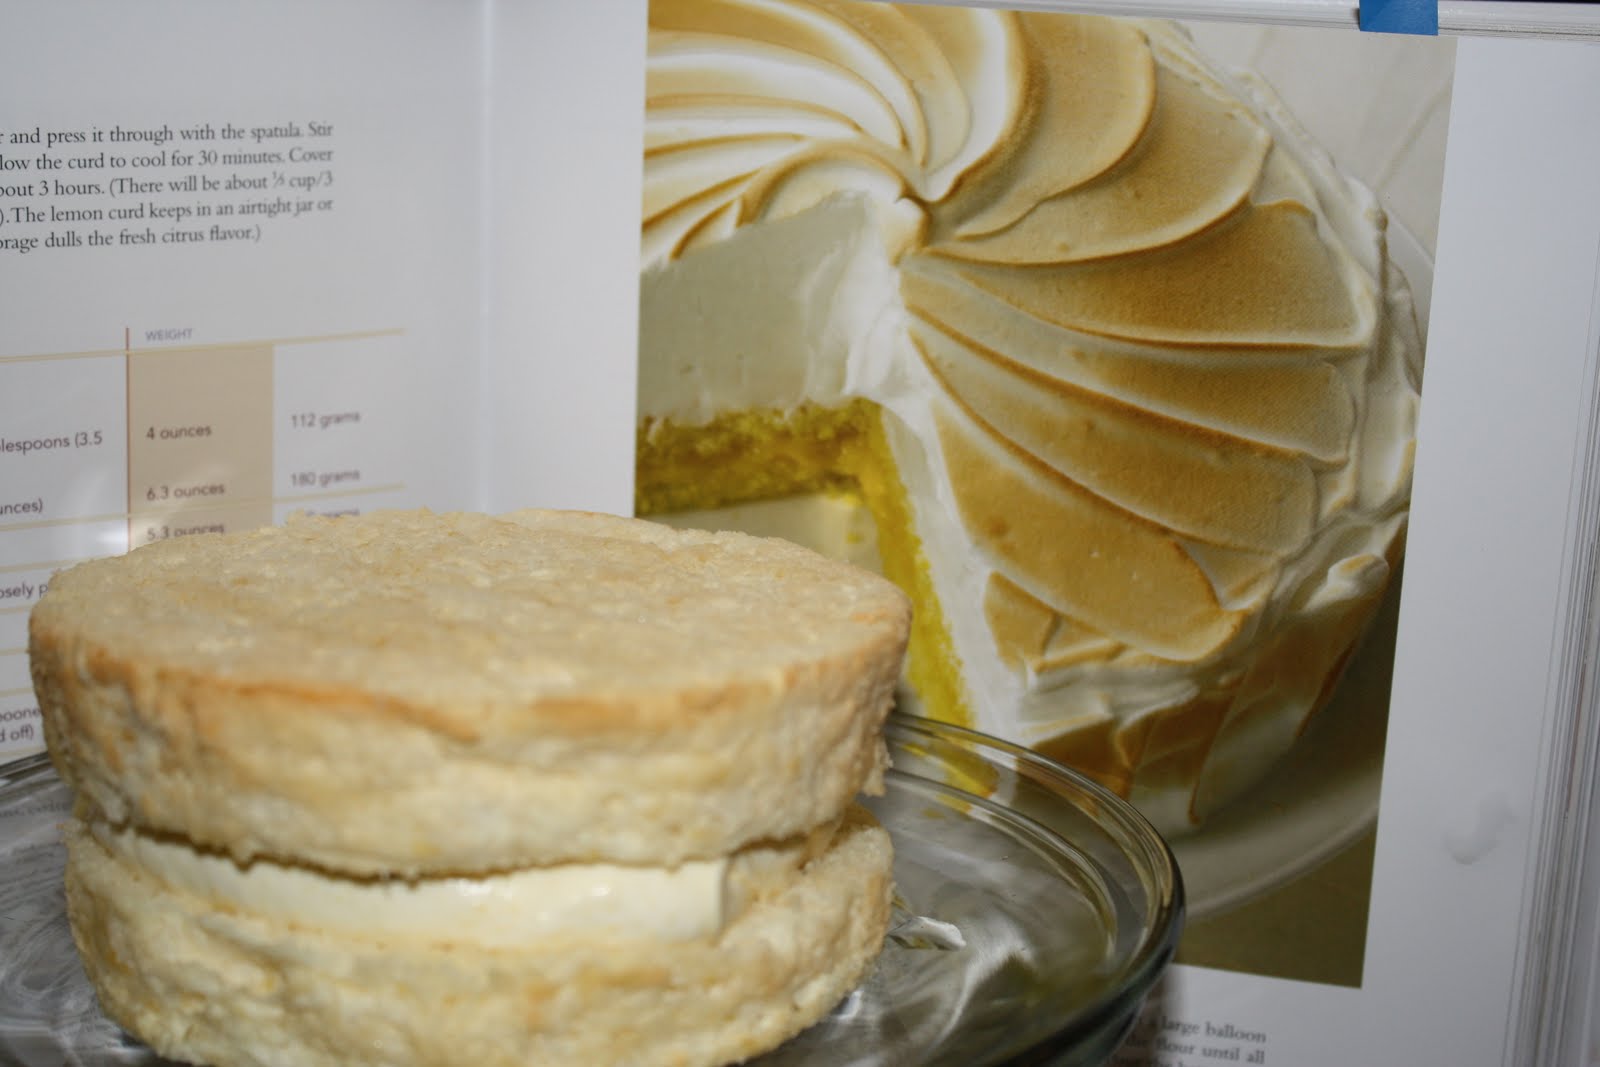 This week with the Heavenly Cake Bakers it was a free choice. Free choice to me meant something I missed doing which this time meant Lemon Meringue Cake, which was really Lime Meringue Cake, phew! Before I get into talking about this wonderful cake I want to thank Marie at the Heavenly Cake Place for making me, yes me, the featured baker last week. It was an honor, thank you. I must admit that most of what I have baked from Rose's Heavenly Cakes has been very tasty, with easy to follow instructions and I am happy to be a part of this group.
Now, on to this weeks challenge of Lime Meringue Cake. There were three components to this light and airy cake. First the cake of course, a genoise cake with Wondra Flour again (note to self- must get some and try it out). Not my favorite type of cake since it is usually a bit dry. However, there are those times  when the cake needs to be a bit drier to support a very moist filling or topping, as in this case. The cake was soft and billowy and easy to put together. Next up is a quick and easy lime simple syrup which btw takes care of most of the dryness in the cake.
 when the cake needs to be a bit drier to support a very moist filling or topping, as in this case. The cake was soft and billowy and easy to put together. Next up is a quick and easy lime simple syrup which btw takes care of most of the dryness in the cake.
The next component is a lemon curd (again lime in my case). Made with silky, golden egg yolks, lime juice, zest, sugar and salt....easy. No suprises here with successful results. However, I did take some liberty here and lighten the finished curd with some whipped cream. This made for a creamy, lighter filling not too over-powering. In one word- lovely.
The final component was a meringue, not just any meringue nope, an Italian Meringue. Italian Meringue is made with a boiling (248-250 degree) sugar syrup poured slowly over the whipped egg whites. This mixture also contained some lime juice, sugar, and cream of tarter. Making meringue can sometimes be a little tricky along with the danger of burning yourself should any of the syrup splatter on you. To avoid this either turn the mixer off when adding the syrup to the egg whites or pour it very carefully down the side of the bowl being mindful not to hit the whip attachment. Whichever you chose take your time with this step or the eggs will deflate and you will not have the cloud-like meringue you so deserve.
 Time to assemble and finish this lovely cake. As you can see I cut this recipe in half (which is standard for me)yielding a small cake and a mini-me cake, just enough. I sliced both cakes into 2 layers, brushed the lime syrup on each layer. Then filled the layers with the lightened curd and covered the cakes with the Italian Meringue. Now the part where I feel like the mad scientist.....using my handy torch I slowly, artfully toasted the meringue allowing some of the texture to show up.
 Alas, overall I think this is a tasty cake. I like the smooth filling, the flowery flavor of lime, and the light meringue topping. I still feel the the cake is dry. Maybe I am not soaking the layers with enough of the syrup. Anyway, I am hoping a day of rest in the refrigerator will allow all the flavors and moisture to merge more evenly. Am I the only one who thinks genoise cake is too dry? If so what could I use instead?
Monday, September 6, 2010
Golden Round Ingots
 If you visit me often you already know that I make Financiers often so when I saw that this week the Heaven;y Cake Bakers were to make Gold Ingots I paused only for a moment and thought. This meant I would have to deviate from my recipe of choice and try something new. Not such a bad concept so I went for it. However, being the over achiever that I am, not only did I make the Golden Ingots (in the round) but I proceeded to make the Chocolate and Peanut Butter Ingots as well. This proved to be very interesting for me on a few levels. First off the most obvious is that I don't have a loaf shapped silicone pan. Silicone is not my favorite vessel for baking but, I had purchased one many moons ago to experiment with.
 The three financiers recipes and my own all call for the same basic ingredients; almond flour, butter, superfine sugar, flour, baking powder, egg whites, and flavoring (vanilla, almond, cocoa, or peanut butter).
The techniques for the three varieties from Rose's Heavenly Cakes along with my recipe of choice were almost the same. Almost I say for two reasons. The first reason is that Rose's directions call for beurre noisette which is what intrigued me from the start. There isn't a recipe that I have tried that does not benefit from browning the butter. This was no exception. The second difference was in making the batter. Specifically in the treatment of the egg whites. In the Gold and the Chocolate Ingots the egg whites are added to the dry ingredients and mixed with a flat beater just to incorporate. In the Peanut Butter Ingots and my recipe of choice, the egg white are beaten first with the whisk  attachment. After which the dry ingredients are added and then the butter is added slowly giving the mixture a chance to emulsify. I prefer this procedure and find that it makes for a fluffier batter and a lighter financier.
 attachment. After which the dry ingredients are added and then the butter is added slowly giving the mixture a chance to emulsify. I prefer this procedure and find that it makes for a fluffier batter and a lighter financier.
In the end I found the Golden Ingots to be a little dryer, rougher in texture and not as flavorful as I had expected even though I added extra vanilla. The Peanut Butter and Chocolate Ingots were much more flavorful and moist.
Clearly I will rotate my recipe of choice to include Rose's Chocolate and Peanut Butter versions. Let me know what you think or feel free to share your recipe. Mine can be found in an earlier post if you you want to try it.
Subscribe to:
Posts (Atom)


