Wednesday, September 29, 2010

Monday, September 27, 2010
Decorated Sugar Cookies
 The September 2010 Daring Bakers' challenge was hosted by Mandy of "What the Fruitcake?!" Mandy challenged everyone to make Decorated Sugar Cookies based on recipes from Peggy Porchen and The Joy of Baking. "Oh yes!", was my first thought. I don't usually make sugar cookies and never have I ventured into decorating cookies with royal icing. Such a simple project yet a perfect chance to let the inner artist (raised eyebrow) take over.
Mandy requested only two things. First to use the Basic Sugar Cookie recipe provided and second that it must be in the theme of September. So first up is the sugar cookie; butter flour, superfine sugar, egg, and vanilla ( I added a touch of nutmeg to give them a little warmth to go along with the September theme). How easy is that! Yet this sugar cookie had just the right crunch (you know it's all about the crunch!) and lots of buttery goodness. I made the dough and froze it until I had the time to bake it off. The cookie dough was easy to roll out and didn't stick to the parchment (ahh, such a pleasure). After baking I froze the cookies until I had the opportunity to decorate.
 Royal icing from scratch (using egg whites instead of meringue powder) is another one of those things that I just not had the opportunity to try out. Royal icing is quick, easy, and actually tasty when almond extract is added to the powdered sugar, lemon juice and egg white. After getting this completed it was time for the best part, the decorating.
The first step before decorating the cookies is to plan it all out. What you want to cover with icing and what colors. Get it all set up and ready; that means bowls for mixing color, bags to hold the icing and tips on the bags. Then outline the area you plan on covering with the tinted royal icing. This creates a dam so to speak. Then thin the icing just a tad so that it will "flood" the area and look smooth. More planning than I originally thought but no worries.
This was really enjoyable and quite relaxing. I learned that first of all and probably most importantly that you cannot be in a rush. And that I need to use a smaller tip for the outline next time. Lastly to keep the outline neat because it shows. Although  my decorating wasn't as neat as I invisioned this was a fun project, thank you Mandy.
 my decorating wasn't as neat as I invisioned this was a fun project, thank you Mandy.
Friday, September 24, 2010
Orange Date Pinwheels
The date has been a staple in the Middle-East for thousands of years. The Ancient Egyptians used the date to make wine. It was regarded as a symbol of fertility. They can be eaten as they are or stuffed with nuts or candied fruit. Dates can be used in all types of baking, ice cream, made into wine, and vineagar. The sweet and creamy-like texture of this delectable fruit is one of my favorites. Today in preparation for the visit of a special friend I am making Orange Date Pinwheel. Lets get started!


Filling
10oz of pitted dates chopped
2/3 cup orange juice
3 tbs light brown sugar
1/4 tsp cinnamon
Combine dates, orange juice, brown sugar and cinnamon in a medium saucepan and place over medium heat. Simmer, stirring often for 5-6 minutes until the liquid is absorbed. Remove from heat, cover and let cool. Place in food chopper or food processor and pulse until smooth. Cover and set aside.
Dough
3 1/3 cups flour
3/4 tsp baking powder
1/4 tsp salt
1/4 tsp cinnamon
3/4 cup butter, room temperature

2/3 cups sugar
2/3 cup light brown sugar
2 eggs
1 tsp vanilla
1 tsp orange zest
Stir together dry ingredients. Place butter in a the mixer bowl and beat until light. Add sugars, eggs, and vanilla, zest, and beat until smooth. Beat until fluffy and well blended. Gradually add the dry ingredients mixing just until incorporated. Wrap dough in plastic and place in refrigerator to chill at least1 1/2 hours or overnight.
To form the pinwheels, roll the dough out on a lightly floured surface into a 12" x 18" rectangle. Spread filling evenly over the surface. Working from the longer end roll up jelly roll style to form a 24" log. Wrap in plastic and chill at least 2 hours. Yes, chill it's worth the extra time.
 Preheat oven to 350 degrees. Line cookie sheets with parchment. Using a shap knife slice 1/4" slices from the log. Bake 13-15 minutes until the edges are golden. Remove from oven and cool completely. Keep them in an airtight container no longer than a week or freeze for longer storage. You can substitute drien plums for the dates, they are just as delicious. I hope you enjoy these as much as we do!
 Preheat oven to 350 degrees. Line cookie sheets with parchment. Using a shap knife slice 1/4" slices from the log. Bake 13-15 minutes until the edges are golden. Remove from oven and cool completely. Keep them in an airtight container no longer than a week or freeze for longer storage. You can substitute drien plums for the dates, they are just as delicious. I hope you enjoy these as much as we do!
Wednesday, September 22, 2010
Ice Cream Roll + a recipe!
I've been a little remiss in my posting lately and I feel terrible about it. It's not that I let my life get in the way or that I haven't baked....really. Quite the opposite actually. I've been baking up a storm testing some recipes for an adult pastry class I teach and entertaining house guests. So you know there has been plenty around to photograph. Yet it is disappearing faster than I can set up and snap a photo! So anyway, I made this delicious ice cream roll cake and hide two slices just for you, awww.

This recipe is one of my stand bys and it is one of my most requested. It is easy, versitale, and very forgiving. So lets get down to it.

Ingredients:
1 cup cake flour
1/4 cup cocoa
1 tsp baking powder
1/4 tsp salt
3 eggs
1 cup sugar
1/3 cup water
1 tsp vanilla
1/2 gal ice cream (any flavor homemade or store bought)
Heat oven to 375 degrees. Line a jelly roll pan 15x10x1 (approx) with parchment and coat lightly with butter or non-stick spray. Stir together flour, cocoa, baking powder, and salt; set aside.
In a mixer bowl, with the whisk attachment beat the eggs about 5 minutes or until thick and lemon colored. Gradually beat in the sugar. Lower the speed, blend in the water and the vanilla. Gradually add the dry ingredients, beating just until the batter is smooth.
Pour into the pan and spread to the corners. Bake 12-15 minutes or until wooden pick inserted in the center comes out clean. Loosen the cake from the edges; invert on clean piece of parchment sprinkled with powdered sugar. Carefully remove the original parchment. While the cake is still hot, roll cake from narrow end. Cool on wire rack.

Remove ice cream from freezer and place on your counter for 10 minutes then proceed. Unroll cake carefully and spread softened ice cream over cake leaving 2" of the edge opposite you without ice cream. Re-roll cake, wrap with plastic, place in freezer to set up at least 3 hours.
Dust top with powdered sugar before serving.
Remember I said this is versatile. That means change the ice cream flavors, or fill it with a layer of cut up fruit and whipped cream or just whipped cream. If you want a yellow cake just substitute the 1/4 cup of cocoa for 1/4 cup more of cake flour.
Have fun and enjoy!

Wednesday, September 15, 2010

Monday, September 13, 2010
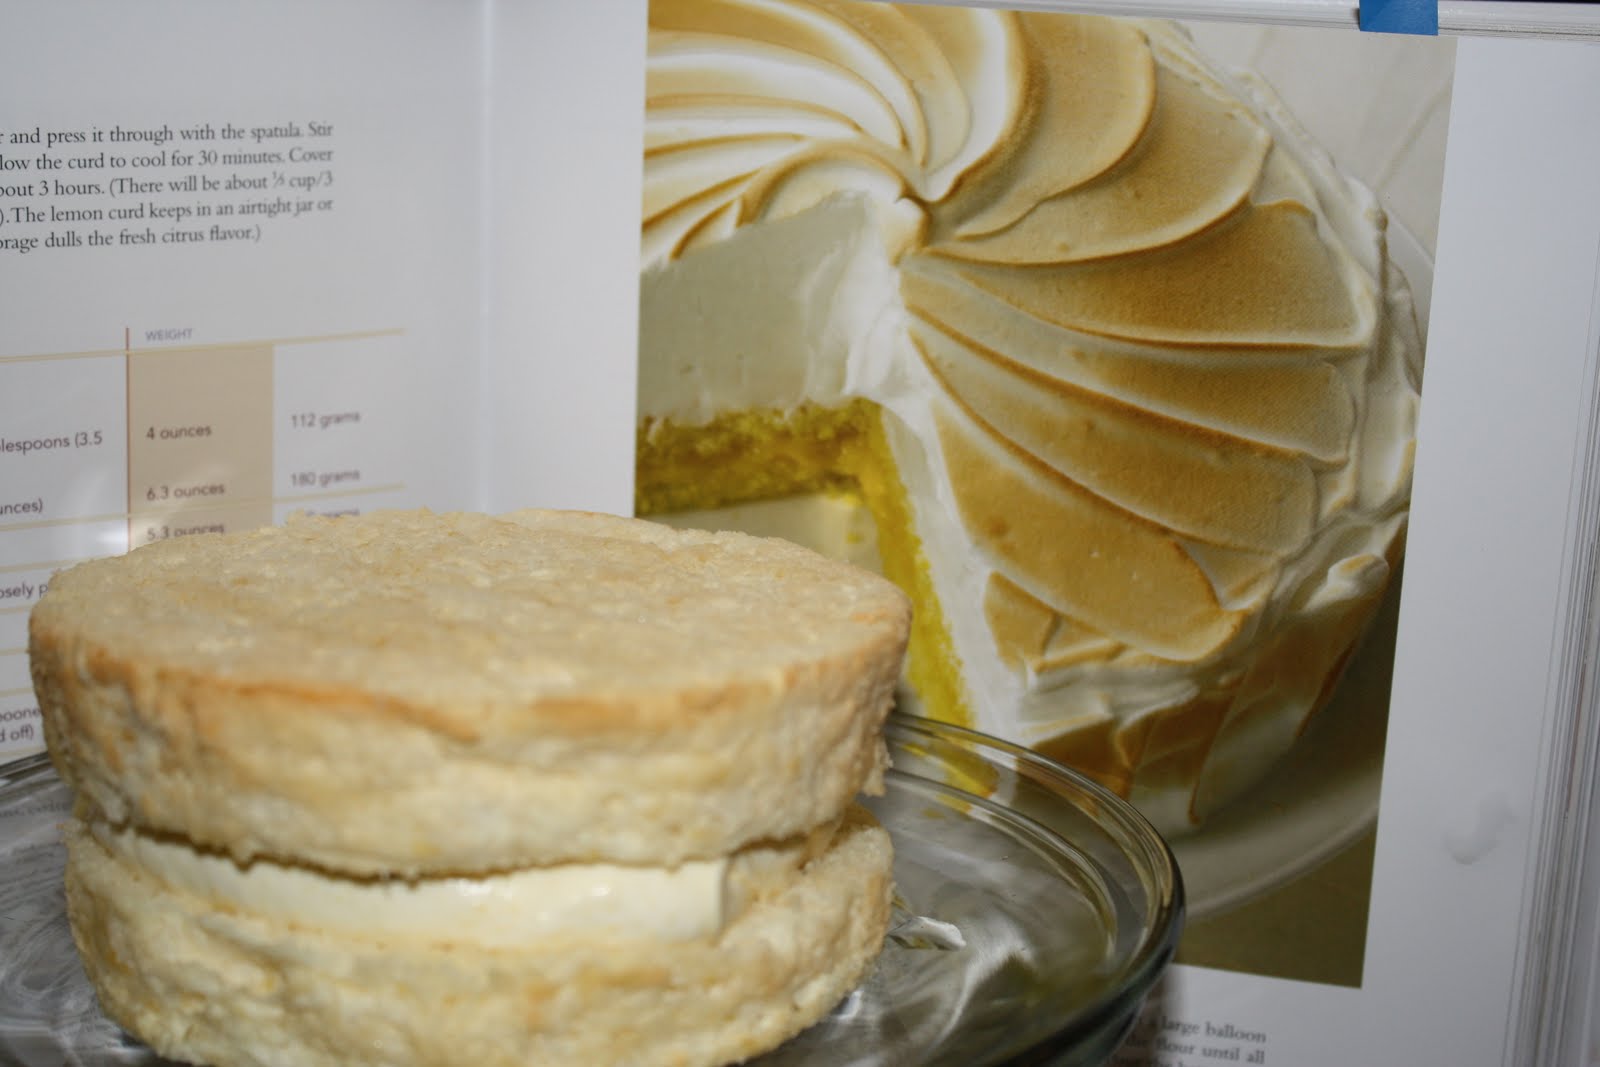
Free Choice- Lemon Meringue Cake
 This week with the Heavenly Cake Bakers it was a free choice. Free choice to me meant something I missed doing which this time meant Lemon Meringue Cake, which was really Lime Meringue Cake, phew! Before I get into talking about this wonderful cake I want to thank Marie at the Heavenly Cake Place for making me, yes me, the featured baker last week. It was an honor, thank you. I must admit that most of what I have baked from Rose's Heavenly Cakes has been very tasty, with easy to follow instructions and I am happy to be a part of this group.
Now, on to this weeks challenge of Lime Meringue Cake. There were three components to this light and airy cake. First the cake of course, a genoise cake with Wondra Flour again (note to self- must get some and try it out). Not my favorite type of cake since it is usually a bit dry. However, there are those times  when the cake needs to be a bit drier to support a very moist filling or topping, as in this case. The cake was soft and billowy and easy to put together. Next up is a quick and easy lime simple syrup which btw takes care of most of the dryness in the cake.
 when the cake needs to be a bit drier to support a very moist filling or topping, as in this case. The cake was soft and billowy and easy to put together. Next up is a quick and easy lime simple syrup which btw takes care of most of the dryness in the cake.
The next component is a lemon curd (again lime in my case). Made with silky, golden egg yolks, lime juice, zest, sugar and salt....easy. No suprises here with successful results. However, I did take some liberty here and lighten the finished curd with some whipped cream. This made for a creamy, lighter filling not too over-powering. In one word- lovely.
The final component was a meringue, not just any meringue nope, an Italian Meringue. Italian Meringue is made with a boiling (248-250 degree) sugar syrup poured slowly over the whipped egg whites. This mixture also contained some lime juice, sugar, and cream of tarter. Making meringue can sometimes be a little tricky along with the danger of burning yourself should any of the syrup splatter on you. To avoid this either turn the mixer off when adding the syrup to the egg whites or pour it very carefully down the side of the bowl being mindful not to hit the whip attachment. Whichever you chose take your time with this step or the eggs will deflate and you will not have the cloud-like meringue you so deserve.
 Time to assemble and finish this lovely cake. As you can see I cut this recipe in half (which is standard for me)yielding a small cake and a mini-me cake, just enough. I sliced both cakes into 2 layers, brushed the lime syrup on each layer. Then filled the layers with the lightened curd and covered the cakes with the Italian Meringue. Now the part where I feel like the mad scientist.....using my handy torch I slowly, artfully toasted the meringue allowing some of the texture to show up.
 Alas, overall I think this is a tasty cake. I like the smooth filling, the flowery flavor of lime, and the light meringue topping. I still feel the the cake is dry. Maybe I am not soaking the layers with enough of the syrup. Anyway, I am hoping a day of rest in the refrigerator will allow all the flavors and moisture to merge more evenly. Am I the only one who thinks genoise cake is too dry? If so what could I use instead?
Monday, September 6, 2010
Golden Round Ingots
 If you visit me often you already know that I make Financiers often so when I saw that this week the Heaven;y Cake Bakers were to make Gold Ingots I paused only for a moment and thought. This meant I would have to deviate from my recipe of choice and try something new. Not such a bad concept so I went for it. However, being the over achiever that I am, not only did I make the Golden Ingots (in the round) but I proceeded to make the Chocolate and Peanut Butter Ingots as well. This proved to be very interesting for me on a few levels. First off the most obvious is that I don't have a loaf shapped silicone pan. Silicone is not my favorite vessel for baking but, I had purchased one many moons ago to experiment with.
 The three financiers recipes and my own all call for the same basic ingredients; almond flour, butter, superfine sugar, flour, baking powder, egg whites, and flavoring (vanilla, almond, cocoa, or peanut butter).
The techniques for the three varieties from Rose's Heavenly Cakes along with my recipe of choice were almost the same. Almost I say for two reasons. The first reason is that Rose's directions call for beurre noisette which is what intrigued me from the start. There isn't a recipe that I have tried that does not benefit from browning the butter. This was no exception. The second difference was in making the batter. Specifically in the treatment of the egg whites. In the Gold and the Chocolate Ingots the egg whites are added to the dry ingredients and mixed with a flat beater just to incorporate. In the Peanut Butter Ingots and my recipe of choice, the egg white are beaten first with the whisk  attachment. After which the dry ingredients are added and then the butter is added slowly giving the mixture a chance to emulsify. I prefer this procedure and find that it makes for a fluffier batter and a lighter financier.
 attachment. After which the dry ingredients are added and then the butter is added slowly giving the mixture a chance to emulsify. I prefer this procedure and find that it makes for a fluffier batter and a lighter financier.
In the end I found the Golden Ingots to be a little dryer, rougher in texture and not as flavorful as I had expected even though I added extra vanilla. The Peanut Butter and Chocolate Ingots were much more flavorful and moist.
Clearly I will rotate my recipe of choice to include Rose's Chocolate and Peanut Butter versions. Let me know what you think or feel free to share your recipe. Mine can be found in an earlier post if you you want to try it.
Subscribe to:
Posts (Atom)


