Monday, July 26, 2010

Swiss Swirl Ice Cream Cake

The summer so far has been crazy, fun, hot and humid. I know what you are saying with that crooked smile, "yeah..... and so?". Well you are absolutely right nothing should come between me and my baking. Therefore, I decided this was as good a time as any to expand my horizons and take on another challenge. This time it is with the Daring Bakers. The July 2010 Daring Bakers' challenge was hosted by Sunita of Sunita's world -life and food. Sunita challenged everyone to make an ice-cream filled Swiss roll that's then used to make a bombe with hot fudge. Her recipe is based on an ice cream cake recipe from Tastw of Home. What a great project to start with and so perfect for this time of year. There is not alot of baking involved but it does have several components. Sunita requested only that we have fun and stay true to the original idea. Making the Swiss rolls with a filling, two ice creams and a fudge sauce were mandatory. No problem you must know by now what an ice cream lover I am.
Making the Swiss rolls was the first step that needed to be completed, so lets get started.
Ingredients for the cake:
6 medium eggs
1 cup caster sugar + extra for rolling
6 tbs flour + 5 tbs cocoa powder sifted together
2tbs boiling water
a little oil for brushing the pans
Ingredients for the filling:
2 cups whipping cream
1 vanilla pod cut into small pieces
5 tbs caster sugar
Directions:
Preheat the oven to 400 degrees. Brush two 11"x9" baking pans with oil and line with parchment paper.
1.- In a large mixing bowl, add the eggs and sugar and beat until very thick; when the beaters are lifted it should leave a trail.
2.- Add the flour mixture in three batches and gently fold. Fold in the water.
3.- Divide the mixture in the two pans and spread evenly. Bake in center of oven for about 10-12 minutes.
4.- Spread a kitchen towel on the counter and sprinkle a little sugar over it.
5.- Turn the cake on to the towl and peel the parchment away. Trim any crispy edges.
6.- Start rolling from the shorter sides. Cool the wrapped roll on a rack, seam side down.
Make the filling:
1.- Grind the vanilla pieces and sugar in a food processor or blender until nicely mixed together.
2.- In a large bowl add the cream and vanilla sugar and beat until very thick.
3.- Divide the cream between the completely cooled cakes.
4.- Open the rolls and spread the cream mixture.
5.- Roll the cakes up again, this time without the towel. Wrap in plastic and chill in the refrigerator until needed.
I must take a minute here and mention how wonderful the vanilla-sugar came out. A very simple method of incorporating the vanilla into the sugar and adding to other ingredients. Yet I have never done this betore. I added vanilla puree and vanilla bean to cream many times in the past yet never has it ever tasted this good. I will remember this and do it again!!! Thank you Sunita.
At this point I made my own strawberry ice cream and vanilla ice cream (using the method above to incorporate a vanilla pod into the cream). I have writtten out the directions if you are interested in an earlier post. Next up is the preparation of the hot fudge sauce.
Ingredients:
1 cup caster sugar
3 tbs cocoa powder
2 tbs corn starch
1 1/2 cup water
1 tbs butter
1 tsp vanilla extract
Directions:
1.- In a small sauce pan whisk together the sugar, cocoa powder, corn starch and water.
2.- Place the pan over medium heat, stirring constantly until it begins to thicken and is smooth.
3.- Remove from heat and mix in butter and vanilla. Set aside to cool completely.
The final step is assembly (this is the fun part too):
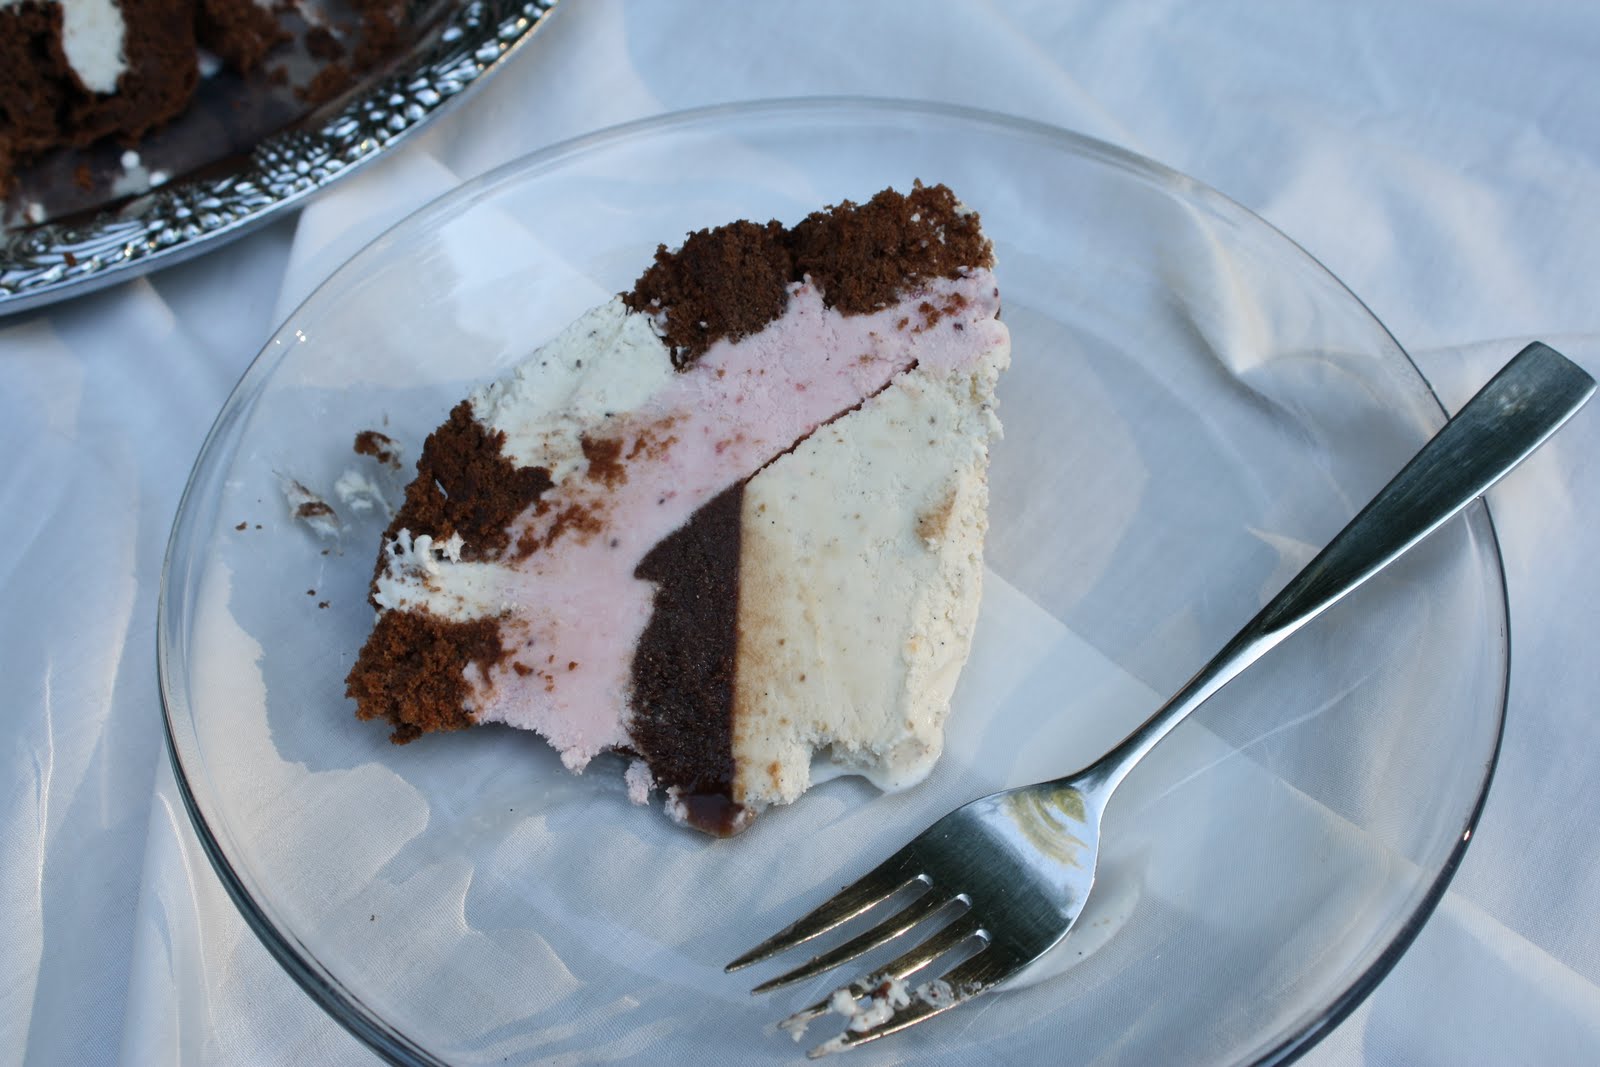
1.- Cut the swiss rolls into 20 slices (approximately 1/2")
2.- Cove the bottom and sides of a bowl (large and about 4" deep) with plastic wrap.
3.- Arrange 2 slices at the bottom and continue around and up the sides. Cover with plastice and freeze until firm. (about 30 minutes)
4.- Soften and spread the first flavor of ice cream (strawberry for me!). Recover and freeze (approximately 1 hour).
5.- Add the fudge sauce over the frist layer of ice cream. Recover and freeze until firm (approximately 1 hour)
6.- Soften and spread the second layer of ice cream (vanilla for me!). Recover and freeze for at least 4-5 hours until completely set.
When ready to serve: remove the plastic and place serving dish on top. Invert and remove the bowl and plastic. Keep the cake out of the freezer at least 10 minutes before slicing.
Well, that's it! The instructions seem long, I know but it is really easy. You can use commercial ice cream and the can will still be fabulous. You can add nuts or even some fresh fruit of the season. I hope you give this a try and I know you will enjoy trying out the many combinations and possibilities. I know I'll do this again.

Wednesday, July 21, 2010

Monday, July 19, 2010

Chocolate Banana Stud Cake

The banana with it's more than 500 varieties is one of nature's more perfect foods. It contains 3 natural sugars, several different vitamins, minerals, and fiber. It is not only healthy but helps to overcome and prevent many illnesses and conditions. They can be eaten straight off the plant, baked into desserts, fried, broiled, steamed or sauteed. Bananas can be pureed and used to replace eggs in a dessert to reduce the fat content or aid in the conversion of a recipe to vegetarian. This week however, my mind was not on the healthful aspect of the banana but on it's sweet, heavenly flavor. Keep in mind when matched with chocolate its flavor can be over powered and may also result in a rubbery texture. This week the Heavenly Cake Bakers project was Chocolate Banana Stud Cake. Sounds sexy and complicated, right? Well, not this time! So, let's talk cake: The list of ingredients doesn't skimp on the good stuff, like butter, eggs, cake flour (ah, the promise of a soft crumb), cocoa (yes, again not an overpowering of chocolate- the banana will shine), sour cream (makes for a smooth consistency), vanilla extract and leavenings. Just a reminder: I hope that in not listing the measurements and recipe details that you are sufficently teased and are more likely to purchase your own copy of this lovely book (enough sales!!!). One of the details that seems to be repeated in many of Rose's chocolate cakes is the use of cocoa instead of squares or slabs. The baker is instructed to moisten the cocoa powder with boiling water and stir until smooth, then cover to cool. This technique I like very much and is probably one of the things I like best about this book. The remainder of the steps are very easy with no suprises. For this cake as with much of my baking I chose to make a half batch and use a smaller cake pan. It baked up nicely and unmolded without a hitch (thanks to the use of my beloved parchment paper). The cakes is finished off with a chocolate ganache which I applied thinly. As you will remember we are not big chocolate lovers. The "stud" look came from applying chocolate chips upside down around the top of the cake. I used both semi-sweet and milk chocolate chips. The slight haze over the top of my chips is from storing them in the refrigerator. If kept too cold some of the cocoa butter will rise to the surface of the chocolate. This does not alter the taste. If this cake was to be given away I would have used a new bag to avoid that haze.

The banana shares the spot light with chocolate amicably. The cake presents itself well and the taste is phenomenal. The fine texture and crumb earns it's place on my "favorites" list.

Wednesday, July 14, 2010

~Wordless Wednesday #5~

An unexpected dinner guest. Too late or too early?

Monday, July 12, 2010

Mini Vanilla Bean Pound Cakes

This week's project with the Heavenly Cake Baker was Mini Vanilla Bean Pound Cakes. Pound cake is one of my favorite cakes and coupled with the star ingredient vanilla bean, I was looking forward to this from the time I spotted it on the schedule of projects. The cake in this version is soaked with a vanilla Cognac syrup too, yum! Pound cake is a British creation dating back to the 1700's. The original recipe used one pound each of eggs, butter, sugar, and flour. No leaveners were used except for the air whipped into the batter. Over the years the ratio of these ingredients has changed and leaveners are used to lighten it up a bit. The pound cake is very versatile and has many variations and versions. Rose Levy Bernanbaum, author of the lovely, "Rose's Heavenly Cakes" gives the baker a short ingredient list, nothing complex for technique and flavor that raises the bar on this version to excellent. So lets talk. The star ingredient here is the vanilla bean, two to be exact. Then there is sugar, eggs, milk, cake flour (yes, a fine crumb), leavening, salt, butter (of course) and vanilla extract. The vanilla beans are to be split and scrapped into the sugar and rubbed to distribute evenly (.a.k.a: vanilla sugar which on its own can be used in many applications). The liquid ingredients are mixed together as are the dry ingredients. Then the butter is added to the half the liquid mixture followed by the dry ingredients and the balance of the liquid. See? Simple......remember the vanilla and the delicate cumb is what makes these little cakes so special. As the cakes cool a vanilla Cognac syrup is prepared. I used Vanilla Schnapps in place of the Cognac along with sugar and water. After bringing the mixture to a boil remove it from the heat. Cover and cool. Once the cakes are cooled the syrup is brushed over the cakes. This cake rates high on my list. It was a breeze to prepare, the fine crumb and moist cake was delicious. The syrup inhanced the beautiful vanilla flavor. This is truly a keeper as "J" would say.

Tuesday, July 6, 2010

Tomatoes and basil oh my!

So did you guess? It wasn't hard, there are actually two correct answers to my previously posted question from my favorite market stops. For the first delicious combination we took the semolina bread, tomatoes and mozzarella and them up about 1/4" thick. A chiffonade of basil was made and the olive oil was standing ready. A slice of tomatoe and cheese is placed on the bread sprinkled with basil and drizzled with olive oil. Wow....yummy! Now I'm sure you are looking for a photo of this delicious finger food but, sadly it was eaten faster than you can say "wait for the camera"!
Anyway the second delicious combination was set up for a grilled pizza (thank the stars the camera ws ready for this one). The dough recipe is easy and I have posted it in the past (you can search it or use your favorite). A light marinara sauce was prepared and set aside. Again sliced tomatoes, mozzarella and a chiffonade of basil was ready to assemble. Cooking pizza on the grill is fun and easy. I use a bread stone on the grill top with the burners to it side on only so as not to burn the bottom.
The two combinations here are our favorite summer-time eats.

Monday, July 5, 2010

Chocolate Ice Cream Cake

Chocolate cake and ice cream, let me see......is there anything here not to like? Thought so. This week with my fellow Heavenly Cake Bakers it was Rose Levy Beranbaum's recipe for Chocolate Ice Cream Cake. I was so looking forward to this project I couldn't wait to get started. There are three components for this recipe and all could be made in advance. Perfect!
For the ice cream portion Rose suggests a home made version. The reason is that commercial ice cream contains more air and will loose two-thirds its volume when softened. Well, we can't have that happen! I chose to make some strawberry ice cream. And being the end of strawberry season I wanted to showcase the little red orbs one last time. Sadly, there will be no more talk of strawberries until next year. The recipe and photos for this egg-less version of ice cream was posted a bit earlier this week. To see it just scroll down a little. Now that the ice cream was safe and sound in the freezer, I moved on.
Rose recommends using the recipe for her German Chocolate Cake when making the cake portion of this project. Remember if you plan on serving a cake cold or even frozen it is important to choose a cake that uses oil rather than butter. This will insure the cake maintains a soft texture. The other interesting technique in this recipe is the egg whites went into the batter unbeaten. The cake rose suprisingly high without the addition of air into the whites, hmmmm. Rose also suggests that you only need to use three-quarters of the batter for this project. I decided to make the full batch and use the last quarter to make a "mini-me" cake. Look left....cute huh!
I would like to take a minute here to give Rose's Heavenly Cakes some praise. I do hope you put this book on your "must have" list. I have yet to be disappointed by the instructions, technique, photos, or results. Please see her book for the ingredients and instructions for this wonderful chocolate, light as air cake. Back to the matter at hand.
The last component is a hot fudge sauce. Since "J" and I don't really like an abundance of chocolate I knew I wasn't going to use much. Luckly I had some of the Dark Chocolate Frosting in the freezer from the Strawberry Cake we made a few weeks ago. Now that the components were prepared I could compose the cake.
This really was quick and easy. The cakes were sliced so the top layer was thinner than the bottom layer.Place the ice cream in the refrigerator for about 30 minutes to soften (a little less if you use a commercially made ice cream). Using an offset spatula spread the ice cream over the bottom layer. Top with the thinner cake layer and drizzle with the fudge sauce or in my case, the softened frosting. Cover well with plastic wrap and place the cake back in the freezer. The hardest part was waiting for the ice cream to firm up!
I can't say how thoroughly please I am with the cake and it soft, light texture. I will definitely be using this again. The ice cream.....well, if you know me you know I could probably survive happily on ice cream! All were very pleased to help with this one!

Saturday, July 3, 2010

Favorite Saturday Morning Market Stops

Farm stands and quaint italian markets are among my favorite Saturday morning stops. I just had to post this picture quickly since these beauties will be eaten quickly. There aren't too many farm stands in my local area so I make the trip when we are yearning for something special that can not be gotten at the local grocers. Today I picked up just a few of our favorite treats. No, you aren't imagining things there is nothing with sugar here today. Oh what a feast this will be, I can hardly wait!Can you guess how these items will be used?