Friday, October 7, 2011

Frangipane Ripple Chocolate Pound Cake

Wow, it that a mouthful or what! This easy-to-do bundt cake is another from Flo Braker wonderful collection. I am a frangipane fan so when this came up on the ABC Bakers list I didn't want to miss it. Frangipane is usually made from ground almonds, egg, sugar, and butter. It can be used as a filling for tarts topped with fruit, cake, pies, and assorted pastries. This is however, the first time I paired a frangipane with chocolate. Almonds usually go very well with chocolate so why wouldn't this? Well, it does and very well indeed!

The base of this bundt style cake is a chocolate pound cake. Also one of my favorite types of cake. I particularly enjoy the small crumb and smooth texture of a good pound cake. For this recipe this ingredients are: cake flour (this is the reason for the fine crumb), cocoa powder (keeps the chocolate from going over the top), baking powder, salt, sugar, eggs, vanilla, milk, and butter of course! My favorite pound cake recipe of choice contains cream cheese, this one uses milk. But alas fear not..... this will not disappoint!
As you can see I went with the mini-bundt pans which makes sharing with friends and neighbors easier. Plus who doesn't like a personal sized treat! I found this pound cake with the frangipane ribbon to be very tasty, moist, and not over the top chocolatey and as promised it did improve with age. I do hope you give it a try, you will not be disappointed.

Tuesday, September 6, 2011

Quintessential Cheese Blintzes

The newest of the  baking projects chosen for the ABC Baker's Challenges is the Quintessential Cheese Blintzes by Flo Braker. Whenever I hear "cheese blintzes" mentioned I am immediately flooded with fond memories. The oldest of them are from my childhood when my grandmother made these for my brothers and I. Light, slightly sweet pillows of delight! As my son was growing up I made them for him as a special breakfast, lunch, or brunch. It was something he also looked forward to equal enthusiasm. So for me doing the cheese blintzes with the ABC Baker's was sheer pleasure.

So last week with the coming storm, not knowing if we would have electricity or when it would return, I felt it best to make these early. As it turned out, just as I was serving them up to my husband the electric went out! Wow, that was spooky!

If you've never had these wonderful little rolls you really don't know what you are missing! And if you think they are difficult, think again. These are really simple to whip up and oh how they will make eyes pop!

The first thing you want to do is get the crepes made. This batter sits in the refrigerator 1-2 hours before you cook it up. All you need is butter, flour, eggs, salt, and water....oh and a nice heavy bottom, non-stick (if possible but not necessary) pan. The procedure is easy and goes quickly. Just pile them up on the side, keep them warm while you make the filling.

Flo suggests using farmer cheese, sugar, egg, salt, vanilla, and orange or lemon zest. Now over the years I've used ricotta and small curd creamy cottage cheese with equal success. They are all good so don't feel guilty substituting!

After the crepes are done and the filling is ready it is time to assemble. Spooning about 1 1/2 tbs of filling spread slightly across the center. Then flip the sides in onto the filling and roll from the top down until you have a neat, rectangular package (looks like an egg roll). Then saute them in butter until they are slightly brown. Flip them gently and brown the other side. Viola!

I served them with a yummy black cherry preserve over the top. You can use any jam or preserve, powdered sugar, or naked. They are all good. This was sooooo good I hope you will try them. Let me know what you topped them with! 

Wednesday, August 17, 2011

A special birthday and a fun project all in one!

I play around with fondant and gum paste whenever possible. Which believe me isn't often enough. So when my nephew's 30th birthday came up I figured I would use this celebration, make it special in my way and give him something he and his 70 guests can enjoy as well. The weather was promising to stay sultry and and we needed to travel two states over (probably in traffic). So with all this in mind I knew buttercream and cake were out! Why not cookies? I knew his favorite is chocolate chip. So how do I make this special...hmmm. 

I thought I'd pick up a party bucket and fill it with cookies; that would be a variety of chocolate chip cookies. This meant: mint chocolate chip, white chocolate chip, toffee chocolate chip, peanut butter chocolate chip, milk chocolate chocolate chip, butterscotch & chocolate chip, and chocolate chocolate chip (phew). I filled the bucket with over 200 of these little darlings. Then to top the bucket and give me a good strong base I made a 14" diameter giant chocolate chip cookie. Then, here comes my favorite part........ I made a "30" out of rice krispie treats, covered it in fondant in the "steam punk" style. The reason I chose Steam Punk style due to its use of wood and metal. My nephew is a carpenter by trade so to me it was a good match.
Unfotunately I did not get the opportunity to take a picture of the assembled project. Hope you like it as much as he did!

Tuesday, August 16, 2011

Neapolitan Bars

Neapolitan Bars, sounds interesting, right? Sounds like it has some layers of flavor like Neapolitan ice cream, right? Yes and yes, it is and does. I was so honored when Hanaa of the ABC Bakers asked if I would like to choose one of the next baking projects. There was no delay in my choice. I had just made these bars and was very excited to share. This special treat and newest baking project can be found in Flo Braker's book, "Baking for All Occassions". 

One of the things that I like about Flo Brakers' books (I currently own 2) is that she has a wide assortment of recipes. Some cookbook authors are heavily into chocolate or some other ingredient. It becomes difficult to bake from such a book if you are not in love with that ingredient. But as I said, Flo is different and I never tire of perusing her books for a new baking project. And this recipe will not disappoint. Enough of all that lets get to the bar!  

 This bar actually has 4 layers of flavor. The first layer is a pastry like cookie layer rich in butter and delicate vanilla flavor. It is quick to assemble and and is baked to a slightly golden color.

The next layer is raspberry jam. This could probably be switched out for apricot, blackberry, strawberry or any flavor you desire. It is spread thinly on top of the cooled pastry. 

Next the filling is prepared.  It consists of almond paste (yum, right!), sugar, butter, eggs, and vanille. You can tint this green or not. The filling is spread over the raspberry layer. Bake this for 35-40 minutes until the top is just firm, not hard. Cool completely on a rack.

The last layer is a chocolate glaze. Butter, chocolate, whole milk, sugar, salt, and vanilla is melted together into a creamy, smooth, and rich glaze. Spread over the top of the filling using an offset spatula. Allow the bars to cool completely before cutting into small squares for serving.

These bars are extremely delicious. And are an impressive addition to any table for any occassion. Enjoy!

Thursday, August 11, 2011

Old Fashioned Sour Cream Cookies

Sour cream cookies sound a little bland to you? Well that depends on what you look for in a cookie and what tips the scale and makes  it to your "favorites" list. Me? I usually go for crunch, a little color, and flavor I can taste. Sounds like these cookies shouldn't be on my list of favs but, they are! In fact they are one of my oldest and most favorite cookie. Here's why: they are soft as in cake-like, sweet but not over the top, the flavors are clean, simple, and delicate ( I just love vanilla and nutmeg too). These cookies are simple to prepare as long as you let the dough chill overnight in the frig. Don't forget to vary the size and shape too. What wrong with all that!? Nothing in my book so on with the full recipe....

1/2 cup butter
1 cup sugar
1 egg
1 tsp vanilla
2 2/3 cups flour
1 tsp baking powder
1/2 tsp baking soda
1/2 tsp salt
1/4 tsp nutmeg
1/2 cup sour cream
A little sugar for sprinkling on top

Preheat oven to 425 degrees. Mix butter, sugar, egg, and vanilla thoroughly. Blend dry ingredients; add to sugar mixture alternately with sour cream. Blend until combined (don't over mix). Cover dough tightly and chill several hours or overnight.

Divide dough, sprinkle with flour, and roll out between parchment paper to 1/4" thick. Cut with a 2" cutter and shape you wish. Sprinkle with sugar. Bake 8-10 minutes until slightly brown.

See how easy that was? Sometimes easy is suprisingly best. What is also very nice is that they can sit on any dessert table, for any occassion. Let me know what you think. 

Wednesday, August 3, 2011

Congo Brownies

The August baking project with the ABC Bakers was Congo Brownies, found in Flo Braker's Baking for All Occassions. Now just to set the story straight I am not a brownie person. In fact I couldn't tell you when the last time I made brownies. Now come on, stay with me here. This will end well, I promise. As I was saying......brownies to me are gooey, soft, over the top chocolatey. I don't mind chocolate if it is in the form of Lindt Truffles but over the top brownies not so much. But, being a good sport and having hungry neighbors I went with the program. As it turns out these were definitely different and....wait a minute you're just going to have to read through to find out how this story turns out.

This is not your usual brownie recipe, it is a combination of a brownie and a nut studded blondie, that's right! First the Congo layer (blondie incognito) made with all the usual participants including yummy brown sugar and studded with walnuts. This wonderful layer is partially backed then removed from the oven for the addition of the brownie layer.

The brownie layer again has all the usual participants but includes not only cocoa but melted unsweetened chocolate, over the top? Or maybe its just a nice balance of chocolate that helps to tone the chocolately sweetness down a bit. Back in the oven to finish baking.

After cooling there is a drizzle of melted chocolate and I added another drizzle of white chocolate for a continuation of the black and white theme. I must say this was not gooey and not mushy. The texture was closer to cakey, much more to my liking. The over all reaction from my tasters was very positive and I must admit that if I was to eat a brownie...this would be the one. I might even suggest some vanilla ice cream on top to finish it off! See it ended well! Enjoy!

Thursday, July 28, 2011

Butterscotch Spiral Coffee Cake

This has been the craziest, busiest, and hottest summer in quite some time. I've been baking, yes ....thank the air-conditioner gods. In addition I had the opportunity to do a fun, creative, eatible project for a family member that I will reveal soon.

For now on to this months late posting of the ABC Bakers project, Butterscotch Spiral Coffee Cake from Flo Brakers book "Baking for All Occassions". I'd never pass up an opportunity to bake a yeasted coffee cake so when this came up I was all over it! That is until the time came to post, well that was a few weeks ago...(head hanging with sad face). Enough of that you get my message.

This yeasted cake recipe called for the usual round up of flour, sugar, salt, yeast, some warm spices like: cinnamon, nutmeg, and cardamom. Also in attendence was milk, butter, eggs, and vanilla. Flo warned us that the dough would be sticky and boy she wasn't kidding. I'm not sure if I did this right but, I had to add much more flour than I expected. This really toppled my confidence but kept going.

At this point a butterscotch glaze is prepared with brown sugar, butter, and corn syrup.  It is poured into the prepared pan. After the suggested rising time the dough is rolled out, spread with a cinnamon/butter filling then cut into strips. The strips are coiled around the pan. It is covered and left to rise again. Bake in a 350 degree oven. I took heed of our fearless leader, Haana's advise and was careful not to over bake. After a short cooling off period the pan is flipped and presto!

Now I'd like to say this was just wonderful but I cannot tell a lie. I didn't find the cake to be very tasty, or yeast-like flaky. However, in all fairness it could have easily been my fault with all that extra flour. The glaze was delicious as was the cinnamon-butter spread. I wouldn't mind trying this again but, I would probably make more changes to make it more interesting. If you try this recipe and get better results let me know.

Tuesday, June 28, 2011

Phyllo to Baklava!

Erica of Erica's Edibles was our host for the Daring Baker's June challenge. Erica challenged us to be truly DARING by making homemade phyllo dough and then to use that homemade dough to make Baklava.

Baklava is a dessert made with phyllo dough, nuts, honey, sugar, and butter. The origin of this sweet is hotly contested but the most often claim is that it came out of the Middle Eastern region. This luxurious dessert was once eaten only by the rich. Today Baklava in its many versions are available for all to enjoy or make as is the case this month.

This was to be an interesting challenge as are all the challenges coming from the Daring Baker's. First, I am not usually a fan of Baklava. The commercial version is often way over the top sweet. Second, is sadly my honey cannot eat the nuts. However, I have thought about making my own phyllo but up until now never had the opportunity. I decided, hey why not just change the filling to dried fruit. 

Making the dough proved to be the easiest part. Rolling it out super thin however was a bit of a challenge. But thankfully it did not stick to the counter. The filling was a mixture of raisins, plums, and dates soaked in orange juice then coarse chopped. 

To assemble was simply layering the phyllo sheets brushed with butter in between. Adding the fruit anfter about 6 layers, then repeating. Using a sharp knife precut the Baklava. Into the oven for a slow bake at 350 degrees for one hour. In the meantime, a syrup of sugar, honey, water, ground cloves and a piece of orange rind was combine. Bring this to a boil and simmer for 10 minutes. This must cool before the Baklava comes out of the oven. Once out of the oven pour the cooled syrup over the top of the Baklava. The syrup will soak into the Baklava overnight.

I was pleasantly suprised to find that I enjoyed this version very much. My honey enjoyed it as well. We all agreed that it was even better the following day! I shall have to work with this phyllo again! 

Tuesday, June 7, 2011

Favorite Buttermilk Cake

Summer is quickly rolling in and I usually  lean towards lighter desserts that require less baking and preparing time. It's a good opportunity to combine a cool and creamy vanilla bean pastry cream, vanilla whipped cream, and fresh, sweet strawberries. All I needed to make this dessert something special was a really good cake. Then along came the ABC's Baker's challenge for this month: Flo Braker's "Favorite Buttermilk Cake". Perfect!

The ingredients for the cake are:
cake flour, baking powder and soda, salt, buttermilk, vanilla extract, butter, sugar, and eggs. The procedure was quick and easy, welcomed on a hot day. The resulting cake is light, soft and moist. The buttermilk gives this cake a slight tang which I think will go well with many cream or fruit fillings.

I used Flo's recipe for vanilla cream filling under the "Boston Cream Pie" recipe. Milk, sugar, vanilla bean, yolks, flour, and butter. All came together resulting in a wonderful silky smooth vanilla cream. Boy, I could just eat this with a spoon and be very content!


To finish I whipped up some vanilla flavored whipped cream, cleaned and sliced strawberries and all was ready to assemble.

This is a wonderful and versital cake. It cut easily into small circles, and held up in the pastry cream without getting soggy. Can't you just see that wonderful crumb. Can you taste it, isn't it light? Can't? Then maybe you should give it a try for yourself. What will you use for a filling, or topping, or maybe all on it's own? So, very good I am sure you won't be disappointed.

Thank you Hanaa for this challenge!   

Tuesday, May 31, 2011

Marquise on Meringue

The May 2011 Daring Baker's challenge was hosted by Emma of CookCraftGrow and Jenny of Purple House Dirt. They chose to challenge everyone to make a Chocolate Marquise. The inspiration for this recipe comes from a dessert they prepared at a restaurant in Seattle.

Not only have I never tried making a Marquise but, I've never even heard of it before.So I was looking forward to this challenge. The directions were given for a full, half or quarter batch. How easy is that. I chose to make a quarter batch since it is just the two of us. And since it has several components I was able to start the process early. "Early", you say? Are you implying that I'm posting this late? Well, you are correct. But, but, but....I have good reasons! But, but, but....better late than never!

The first component is the Marquise. As it turns out this a very decadent, very smooth, very delicious mousse like dessert that sets up in the freezer. Sort of like ice cream but, better. If that can even happen! It starts off with a chocolate base: chocolate, heavy cream, salt, cayenne, hazelnut liquour, corn syrup, canilla, cocoa powder, pepper, and butter. After cooling the base is added to: egg yolks (many of them), whole eggs, sugar, heavy cream. The resulting mousse is spread into a parchment lined pan and placed in the freezer. Easy right?

The next component is a meringue. The usual egg whites, sugar, vanilla, and a splash of apple cider vinegar is whipped up into a billowy cloud of delicious meringue. This is where I have to be very careful. You see, I can just eat this by the spoonful right out of the bowl not thinking about what I originally needed it for.

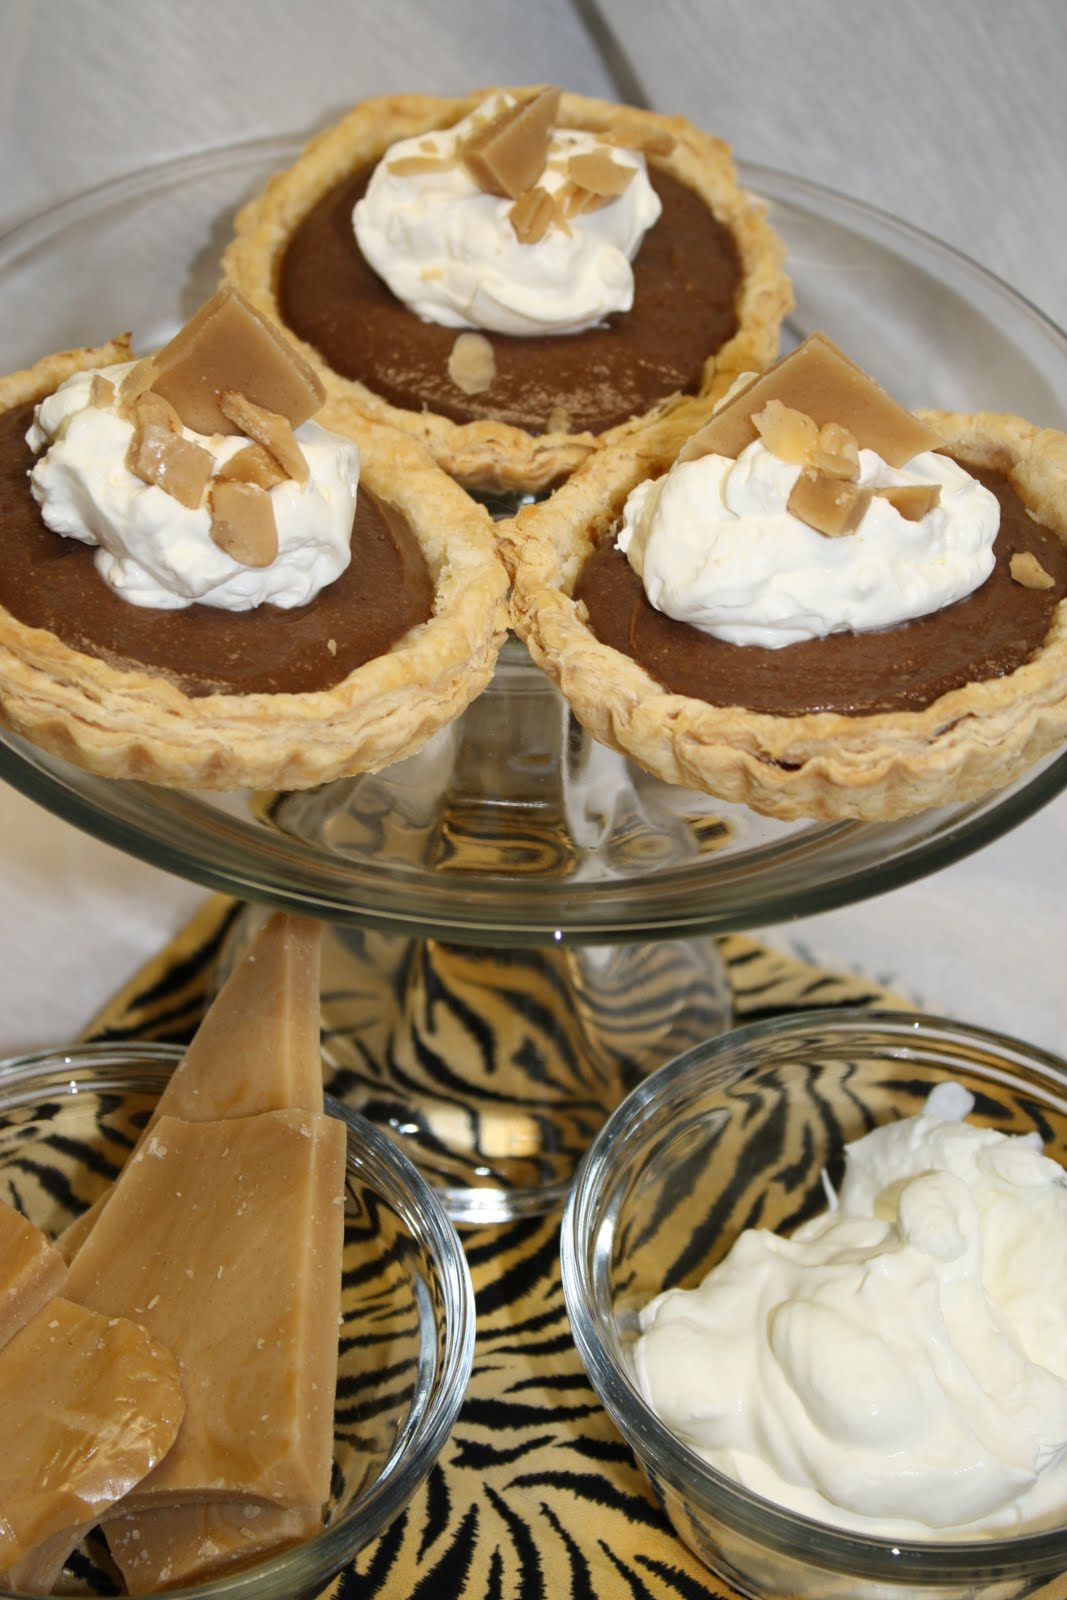
For the third component I used some raspberry jam in place of the caramel sauce called for in the original challenge. I also omitted the spiced nuts since "J" can't eat them.

To plate this dessert requires careful timing if you live in a warm climate. The meringue needs to be ready at the same time as the sauce and spiced nuts. The mariquise is removed from the freezer and unmolded from the pan. I cut 2 1/2" squares and rolled them in cocoa powder quickly, it melts fast. Place the square on your serving plate. Add the meringue. Torch the meringue as desired. Add the sauce and spiced nuts. I allowed the  dessert to sit out for approximately 10 minutes before eating.

It was light, creamy, dreamy, smooth, chocolatey, lovely and very rich (the only negative for "J"). I always enjoy making something new. Thank you Emma and Jenny for this challenge!
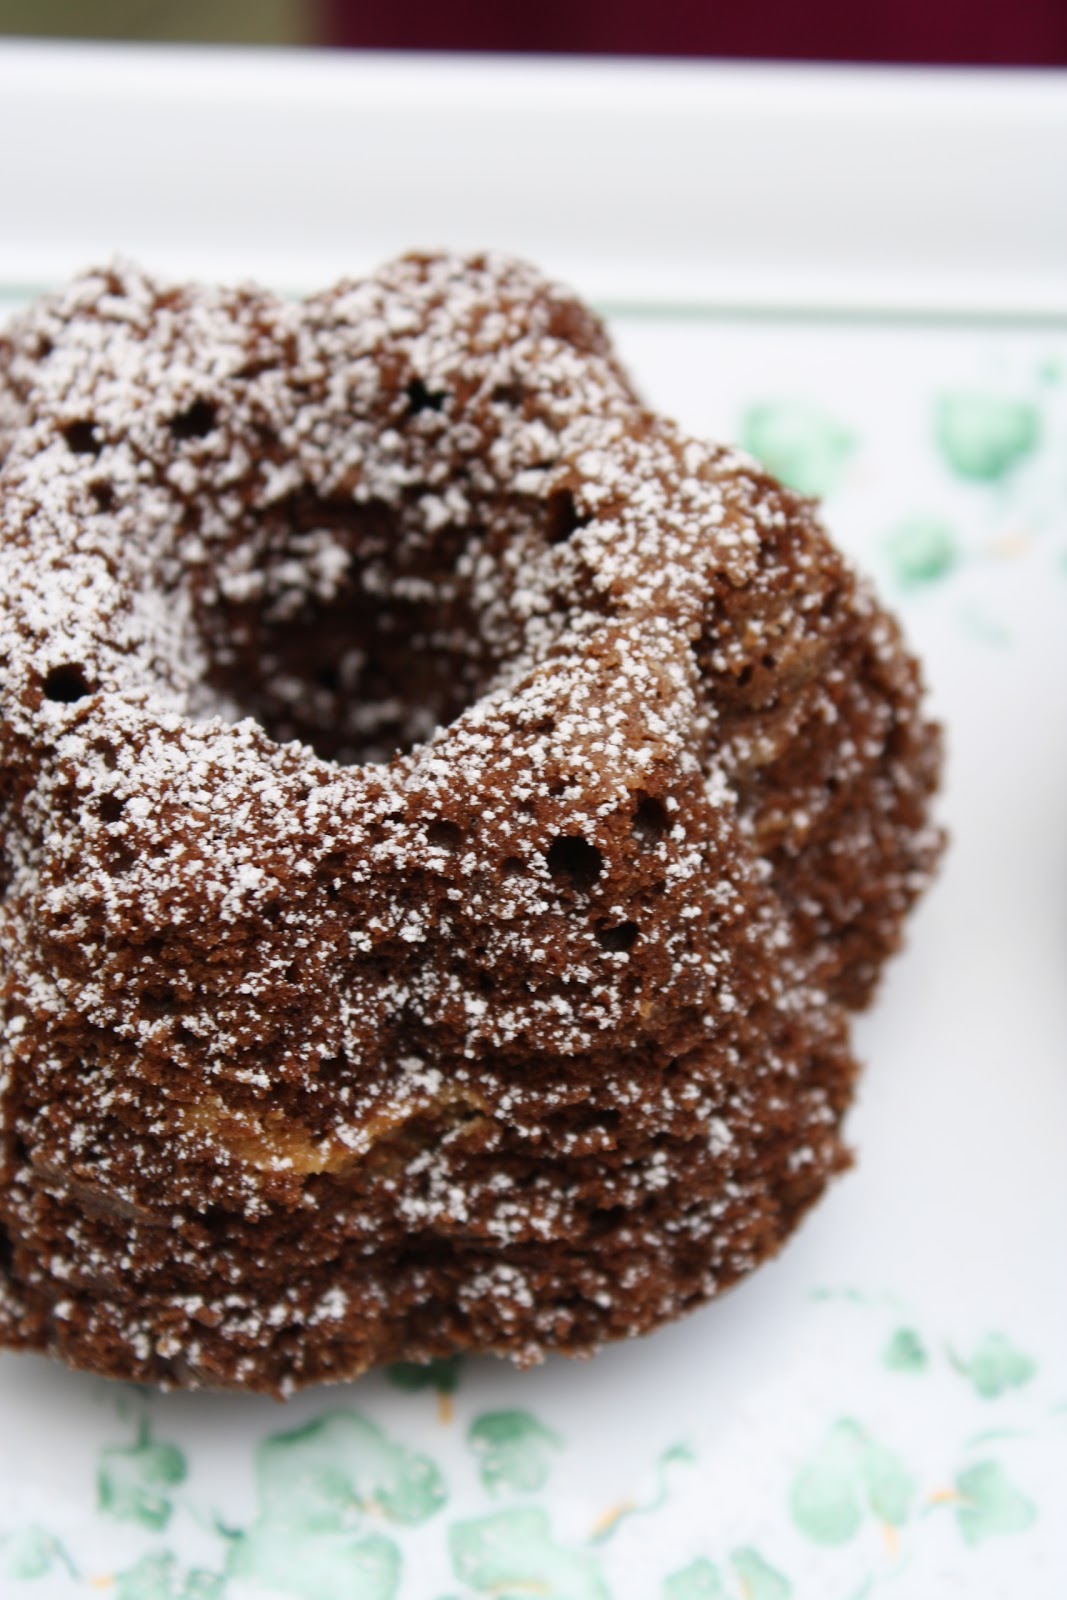
Tuesday, May 24, 2011

Pound Cake

Pound Cake. I just love pound cake. I love the simple flavor of the vanilla and the butter. I love the tender texture and I love the small, yet moist crumb. I love to use it when I need sturdy tall layers and it never fails. I searched a long time, trying many different versions to find what I think is the best. Don't forget the versatility of pound cake. You can change the flavors easily and it's use is endless. I have used it in a 6 layer celebration cake, in a trifle, covered with whipped cream, fresh fruit or fruit curd. It can be taosted and spread with more butter too, if you dare! Today I bring it to you.

Humble Vanilla Pound Cake
1 cup butter, room temperature
2 cups sugar
8 oz Philadelphia cream cheese, room temperature
1 tsp vanilla or the scrapings from a vanilla bean
6 eggs
2 cups flour
1 tbs baking powder
1 tsp salt
Preheat oven to 350 degrees. Beat butter in a large bowl with paddle attachment on medium about 1 minute. Gradually add the sugar, beating well after each addition. Beat additional 5 minutes, or until very light and fluffy. add the cream cheese and vanilla; beat one minute. Add eggs, one at a time, beating well after each addition.

Combine Flour, baking powder, and salt. Add to the butter mixture. Beat one minute. Pour into a greased 10 inch tube pan.
Bake 1 hour or until golden brown. Cool 10 minutes; loosen from sides of pan and gently remove cake. Cool completely on wire rack.

Feel like sharing? How do you like your pound cake? Made with cream cheese, or sour cream or not. Spread with fruit, frosting, curd, or not?

Wednesday, May 18, 2011

Overnight Cinnamon Buns with the ABC Baker's

Has it really been that long?! Oh my! It's not that I haven't been baking that's for sure. It's that there really isn't enough time in a weekend. So I vote for extending the weekends to three days. I'm sure everyone would agree but, sorry it isn't happening so we better make due.
On May 3rd I missed posting the Avid Baker's Challenge of Overnight Cinnamon Buns found in Flo Braker's, Baking for All Occassions. As you can see from some of my recent posts the combination of cinnamon and with any driy fruit or nuts is a favorite. Then add in the overnight rising aspect I wasn't about to miss this challenge. And I am glad I didn't.
The dough for this recipe is a sweet yeast potatoe dough. It called for a Russet potatoe. Since I didn't have one I substituted a Yukon Gold potatoe giving it a slightly more yellow hue. The dough itself was easy to put together (I just love the addition of orange zest). Then into the refrigerator to rise for 8 hours up to 24 hours.
The filling that Flo suggested contained Macadamia nuts. They are one of my favorite nuts; tender and delicious in any application. But sadly, my honey cannot eat them. That's how the raisins found their way in again. Along with brown sugar, cinnamon, cloves, and nutmeg we had a warm and spicey filling.
The next morning I jumped out of bed to finish the assembly of these yummy breakfast treats. Rolling the filled dough into a log is easy for any baker, however it's all about the slicing. The suggestion from Flo is something I discovered many moons ago. Using a long piece of dental floss (unflavored, please!) criss-crossed around the dough, then pull, makes a clean cut.
After rising again, a trip to the oven, a drizzle of icing and.......wow!!! Warm, spicey, slightly sweet, tender, delicate orange flavor, and gone! Not a complaint in the house. What's your favorite filling consist of? Thank you Hannah for this wonderful challenge!

Tuesday, April 5, 2011

Zebra or Striped Cookies

This month the Avid Baker's Challenge was to make Zebra Cookies from Baking for All Occassions by Flo Braker. I must admit the name of these cookies got my attention immediately, it sounded like fun and it was definitely something I had never tried. Then I discovered there was no photo in the book to check myself. This meant I was at the mercy of my interpretation (Read carefully, I told myself. Don't be in a rush). Well, it was fun, a bit time consuming but not difficult at all and well worth it.
The recipe given started with a vanilla and a chocolate butter cookie. The ingredient list was short but, included cake flour. Now I knew this was to be a tender cookie (I like that). The time consuming part was in the assembly. Flo was suggesting the use of a 6x2 inch square pan for assembly. I do not have a pan this size so I just layered on a cutting board.
Each of the two rounds of dough was to be seperated evenly (I weighed mine) into thirds. Then placing one piece at a time between parchment it is rolled into a 6x3 inch rectangle and placed in the prepared pan. Each of the six pieces are rolled out in this fashion and layered, alternating flavors in the prepared pan. You should have 6 layers. I decided to cut the rectangle in half and layer the two halves together for a total of 12 layers. Cover and refrigerate the dough until firm (4hrs or overnight).
Preheat the oven to 350 degrees and line a large baking sheet with parchment.
The dough is then removed from the refrigerator and thinly sliced. Each slice is then cut on the diagonal, forming 2 triangles. place them on the baking sheet about 1/2" apart. Bake in the preheated oven for 8 to 10 minutes, just until they are no longer shiny on top and are pale gold on the bottom.
I found these cookies to be delicious and love the tenderness that the comes from using cake flour. They certainly get attention when placed on the table for tasting. I totally enjoyed making them and all my tester enjoyed eating them. Thanks Hanaa for the challenge!

Sunday, March 27, 2011

Yeasted Meringue Coffee Cake

The March 2011 Daring Baker's Challenge was hosted by Ria of Ria's Collection and Jamie of Life's a Feast. Ria and Jamie challenged the Daring Bakers to bake a yeasted Meringue Coffee Cake. This is the third yeasted cake I have baked this winter season. Each of these cakes were different yet the same. Oh don't misunderstand this is far from a complaint. It's just that each one was so delicious it was very hard to share. However this challenge yielded 2, yes two cakes. Can you see my smile? I can share this time!!!!
Ria and Jaime gave the Daring Baker's the freedom to choose the filling for these beautiful coffee cakes. I chose to keep it simple with a cinnamon and raisin filling. The recipe as you know can be found on some of my fellow baker's blogs. I will leave it in your capable hands to search out. However, I will review the directions.
To preparing the dough combine 1 1/2 cups of the flour, sugar , salt, and yeast in a bowl. Set aside. In a saucepan, combine the milk, water, and butter. Heat over medium heat until warm and the butter is melted.
Using an electric mixer on low speed, gradually add the warm liquid to the flour/yeast mixture, beating until well blended. Increase the mixer speed and beat 2 minutes. Add the eggs and 1 cup of the remaining flour. Beat 2 more minutes. I changed out the beater for the dough hook at this point and add only a little more of the flour. Then kneased the dough for 8-10 minutes until the dough was smooth, soft, and elastic.
The dough goes into an oiled bowl and covered with plastic for its first rise. In the meantime the filling may be prepared. I combined sugar, cinnamon, and raisins in a bowl and set aside. This version calls for a meringue to be prepared using egg whites, sugar, salt and vanilla. When the dough is ready- punch it down and divide it in half. Roll each half one at a time into a rectangle. spread them with the meringue and cinnamon raisin filling. Roll the rectangles into logs and form a ring. Using scissors cut slits along the outside edge.
Cover the cake with plastic and let them rise again. Preheat the oven to 350 degrees. Brush the cakes with an egg wash. Bake in the preheated oven for 25-30 minutes until golden brown and risen. the dough should sound hollow when tapped. I drizzled the top with a lemon juice, powdered sugar and milk glaze. Then sprinkled with chopped pecans.
The cake was soft, delicately sweet with just enough filling to make it difficult to stop at one piece. Consequently, I after tasting I found it very hard to part with the second cake. Although I really love to see that smile emerge when someone takes their first bite. So....off it went to make yet someone else happy.

Wednesday, March 9, 2011

King Cake for Mardi Gras

This week is Mardi Gras and although I have never had the opportunity to join the festivities down south, it does not deter my curiousity. After reading and searching for information and a worthy King Cake recipe this is what I found. The King Cake tradition came to New Orleans with the first French settlers and has stayed ever since. Although some of the details have evolved and changed over the years, whoever got the porcelain baby, coin, or bean in their slice of cake would host the party next year.
For the recipe I decided to use a version from Emeril Lagasse. This version is filled with a sweetened cream cheese filling. This King Cake is a yeast cake enriched with egg and butter. So lets begin with the ingredients.
2 envelopes active dry yeast
1/2 cup sugar
1 1/2 sticks butter, melted
1 cup milk (about 110 degrees)
5 egg yolks, at room temp
4 1/2 cups flour
2 tsp salt
1 tsp nutmeg
1 tsp lemon zest
1 tsp oil
1 lb cream cheese, at room temp
3 cups powdered sugar
1 tsp vanilla
5 tbs milk, at room temp
2 tbs lemon juice
Purple, green, and gold sugar sprinkles (purple for justice, green for faith, and gold for power)
king baby, bean or pecan half
1.- Combine the yeast and sugar in the bowl of a stand mixer fitted with a dough hook. Add the melted butter and warm milk. Beat at low speed for 1 minute. With the mixer running, add the egg yolks, then beat 1 minute at medium speed. Add the flour, salt, nutmeg, and zest; beat until everything is incorporated. Increase the speed to high and beat until the dough pulls away from the sides of the bowl, forms a ball, and climbs up the dough hook.
2.- Remove the dough from the bowl. Using your hands, form the dough into a ball. Lightly oil a bowl with the vegatable oil. Place the dough in the bowl and cover with plastic, Set aside in a warm, draft-free place unmtil doubled, about 2 hours.
3.- Meanwhile, make the filling. In a large mixing bowl, combine the cream cheese, vanilla and 1 cup of the powdered sugar. Blend until smooth. Set aside. Line a baking sheet with parchment.
4.- Turn the dough out onto a lightly floured surface and using your fingers, pat it out to a rectangle about 30" x 6". Spread the filling lengthwise over the bottom half of the dough. Flip the top half of dough over the filling and pinch the sides to seal. Shape the dough into a cylinder and shapre into a ring, seam side down on the parchment lined sheet. Insert the bean, baby, or pecan into the bottom of the ring. Cover the ring with a clean cloth and place in a warm, draft-free place. Let the dough rise until it is doubled, about 45 minutes.
5.-Brush the top of the risen cake with 2 tbs of milk. Bake in a preheated 350 degree oven until golden brown, about 25-30 minutes. Remove from oven and cool completely.
6.- Make the icing: Combine the remaining 3 tbs milk, lemon juice, and 2 cups of powdered sugar in a bowl. Stir to blend well. With a rubber spatula, spread the icing evenly over the top. Sprinkle the sugar crystals, alternating colors. Set aside to set up.
This cake yields 22-32 slices depending on how thick it is cut. The cake is wonderful, the nutmeg is delecate, not overpowering. The cream cheese filling is slightly sweet and the addition of vanillia makes it heavenly. I received many compliments from many tasters. It is really not as labor intensive as it sounds. I hope you give it a try. I know I will be making this again soon (but, I'll have to change the colors and its name)!

Tuesday, March 1, 2011

Old World Braided Coffee Cake

Wow, a record....three posts over three days! Love it! The March project with the Avid Baker's or "ABC" was Old World Braided Coffee Cake from Flo Braker, Baking For All Occassions. This coffee cake is a traditional enriched yeast cake with a delicious walnut filling. It may look difficult and is definitely impressive. It can be enjoyed any time of day or for any occassion. Lets take a look.
I started with the filling a day early. The recipe calls for ground walnuts (but I am sure almonds, pecans, or macadamia nuts can be used with equal success), sugar, brown sugar, cinnamon, salt, heavy cream, maple syrup, vanilla, and egg whites. Quite a list but don't let that scare you away. Aside from the egg whites the ingredients come together very easily in a food processor. The egg whites are added to the mixture after they are whipped. I put the mixture in the refrigerator overnight.
I don't dabble heavily into yeast based recipes because my success rate is usually 50-50. I know, I know success comes with experience. Ok, I really just want a little better odds! Anyway the chicken that I am would have ran the other way at the sight of the "y" word. Lately however, I embrase them still keeping my fingers and toes crossed though.
The sweet yeast dough ingredients are flour, sugar, yeast, salt, milk, butter, vanilla, and eggs. The instructions are a little different in that the yeast is added to the dry ingredients without proofing first. However, to my suprise and relief it worked.
The most impressive part of this project is forming the coffee cake. When the dough is ready it is rolled into a 16x12 rectangle, divided into three vertical strips by gently poking it with a fork. The filling is spread down the middle section. More strips are cut horizontally into the side flaps. Then one by one alternating sides the strips are folded over the filling. The results are a very impressive braid.
The cake comes out of the oven a beautiful golden color with a delicious aroma. A simple sugar glaze is spread over the top for that added shine. This cake is very good and I surely won't hesitate to make it again. Great choice Hanaa!

Monday, February 28, 2011

Sticky Toffee Pudding

This week I was able to hop over to the Heavenly Cake Bakers and join in the fun of making Sticky Toffee Pudding. Sticky Toffee Pudding is something I have never made but have it on my radar to try for quite some time. Several (and I mean probably 5 or more) summers ago a popular ice cream maker had a contest to come up with a new flavor. The winner was, yes you guessed it, Sticky Toffee Pudding. Ever since then it has remained on my mind so this was the perfect chance to give it a go.
The dessert is broken down into 3 main components. The first being the spice cake. The batter calls for stout beer, dates (yum, my favorite), butter, sugar, vanilla, eggs, flour, baking powder, salt, cinnamon, and nutmeg. As always I cut the recipe in half and used a small rectangular Pyrex baking dish. I reduced the oven temperature as per Rose's suggestion and it still took a bit more time than she suggested. No problem though.
The next component is a Butterscotch Toffee Sauce. Here I switched out and used Cinnamon-Honey Carmel Glaze, a recipe from my blogger friend Hanaa, at Hanaas Kitchen. It promised to be a little lighter and included some honey- I was sold! The rest of the ingredients are cinamon, brown sugar, heavy cream, butter, honey, and a little lemon juice. For these directions I'll have to direct you to Hanaa's Kitchen but, it is well worth the trip.
The last component to this lovely dessert is some lightly whipped creme fraiche (I used lightly sweetened heavy cream) and some pecans. To put this all together is a snap. Cut a square of the warm spiced, moist cake drizzled with the lovely, silky smooth Caramel Glaze. Top it off with a dollop of whipped cream and sprinkle with pecans. What is not to like!
All I can say about this is "Oh my this is devine!" Hope you get the opportunity to try some. Let me know what you think!

Sunday, February 27, 2011

The Daring Bakers' Challenge for February 2011

The February 2011 Daring Bakers' challenge was hosted by Mallory from A Sofa in the Kitchen. She chose to challenge everyone to make a Panna Cotta from a Giada De Laurentis recipe and Nestle Florentine Cookies. As soon as I saw this challenge I couldn't help but smile. Panna Cotta or "cooked cream" is one of my honey's favorites. It is light and creamy and simply delicious in any flavor. Topped with a fruit jam, fresh fruit, or gelee it's over the top good!
The recipe that Mallory suggested is from Giada De Laurentis and is my favorite "go to" recipe as well. The ingredients list is short: milk, powdered gelatin, heavy cream, honey, sugar, and a pinch of salt. For the directions I'll let you visit Mallory's blog or one of my fellow Daring Bakers blogs, or you can go back to my post from June 2010. I chose to top mine with some fruite gelee using blueberries that I had been saving in the freezer for just this sort of occassion. I also decided to try some of Mallory's suggested coffee gelee too. I couldn't decide which I liked best. Oh well, I'll just have to keep tasting. :)
The next part of the challenge was to make Nestles's Florentine Cookies. I have made many a cookie in my day but, never a florentine cookie using oatmeal. That's right something healthy....as in oatmeal, and fiber. Oh and a chocolate filling too. We all know how good chocolate is for us!
The cookie dough came together easily and baked up nice and chewy. I had some chocolate ganache from a previous project so I used it to fill the florentines. A wise choice if I do say so myself. These cookies were addicting!
Overall, this was a very tasty challenge. My honey was happy as were my other taste testers. Thank you Mallory for presenting this challenge.

Monday, February 14, 2011

Linzers for Valentine's Day!

What better day to bake up a batch of seductive, deliciously addictive linzer cookies! Actually, I don't need a special day to whip these pretty little cookies up. Linzers can be just as yummy whether they are 2" or 4" in diameter. The nut flour used in the cookie batter can be almond, walnut, hazelnut, or pecan.The jam filling can be absolutely any flavor you want. They are fun and that's why I love these so much. They are also one of the most asked for cookie in my arsenal. Since it is a special day and I know you want to get going we'll get right to my easy recipe.
Raspberry Linzers:
3/4 cup butter
1/2 cup sugar
1 egg
1/2 tsp lemon zest
1 1/2 cup finely ground almonds
1 cup cake flour
1 1/4 cup flour
1/2 tsp baking powder
1/8 tsp salt
1/2 tsp cinnamon
Jam
Powdered sugar
Cream the butter with the paddle attachment (minimally). Add sugar and cream a bit more. Add egg, lemon zest, vanilla, and mix,. Add the nuts; mix well. Stir the remaining ingredient together and add to the butter-nut mixture. Form into a 6" disk, wrap with plastic and chill.
Roll out the dough to 1/8" thick on lightly floured surface or between two peices of parchment (preferred method). Cut with 2-4" round cutter. Cut the center out of half the cookies in whatever shape you desire (round, heart, flour, letter....you get the idea). Chill again for about 20 minutes.
Line cookies sheets with parchment, silicone matt, or silpat. Bake in a preheated 350 degree oven for 12-14 minutes, or just until the edges are golden. Cool completely.
Using a strainer sprinkle the cookie tops only with powdered sugar. Add a small amount of jam (too much will sqeeze out the sides when you take a bite) to the bottom halves and cover with sugared tops. Add a drop to fill the center cut out if necessary.
Well, that's it! Simple, right and a wonderful alternative or as a complimentary partner to chocolate.
Hope you enjoy some time with your special sweetie!

Tuesday, February 8, 2011

Date Nute Bread

One of my favorite foods is.... am I that predictable? Yes, it is the wonderful date. I have made several posts over the past year with the date as the star attraction. Well, nothing takes me back to childhood than thoughts of Date Nut Bread. Anyone out there remember Thomas' brand Date Nut Bread? Well, I loved it smeared with cream cheese. Ooooo yeah! I have been searching but, now I found it! A recipe for it, a perfect recreation. So I won't tease you anymore. 1 cup boiling water 1 cup chopped dates 1 tbs butter 1/4 cup dark brown sugar 1/4 cup molasses 2 tsp vanilla 2 eggs 1/2 cup All-purpose flour 1/2 cup whole wheat flour 1 1/2 tsp baking powder 1/4 tsp baking soda 1/2 tsp salt 3/4 cup coarse chopped walnuts

1.- In a bowl, pour the hot water over the dates and butter. Stir and let stand until lukewarm.

2.- In a food processor, puree 1/2 of the date mixture to a paste. Stir paste back into the date bowl.

3.- Add brown sugar, molasses, vanilla and eggs. Mix until combines. Add the walnuts.4.- In another bowl, sift the flours, baking powder, baking soda, and salt together. Make a well in the center of the dry ingredients and pour in the date mixture. Stir until well combined. Pour the mixture into a buttered and parchment lined loaf pan (9x5).

5.- Bake in a preheated 350 degree oven for 50-55 minutes until the tester pick comes out clean. Remove from the oven and allow to cool in the pan at least 30 minutes before turning out. Optional: Brush the top with honey while still warm. This is the closest I have been able to find to my old favorite. Let me know what you think of this version. And if you want to share your old favorites, please do.

Tuesday, February 1, 2011

Caramel Chocolate Cream Pie & the Avid Baker's Challenge

The "Avid Baker's Challenge?! Yes, this month I joined this fine group of bakers and will continue to bake along with them, positing on the first Tuesday of each month. We are baking from Flo Braker's "Baking for All Occasions". It is not my first experience with Flo Braker. I have been baking from her book, "Sweet Miniatures" for at least 8 years. It contains many of my favorites, so I expect "Baking for All Occasions" to be wonderful as well. Sounds like it will be great fun and my first project with them was just that.
I am not a chocolate fanatic, definitely not a big fan of pudding (the box type), or pies really. But, I am a fan of an occasional piece high quality chocolate and anything creamy and smooth and a buttery, flakey home-made crust! This project contained all of that so I did not hesitate to accept this challenge. The Caramel Chocolate Cream Pie has 5 components: a buttery flakey crust, a layer of smooth, amber caramel, topped with a deliciously creamy chocolate pudding, garnished with sweetened whipped cream and toffee pieces (definitely not your mother's pudding pie!). Mouth watering yet? As you know I don't share recipes from my challenges. I am hoping to entice you enough to purchase the book for yourself. You won't be disappointed. So let me share this experience as best I can with you now.
The first component to prepare was a flakey, buttery crust. Now I am sure you have your favorite just as I do. Since Flo's recipe contained vegetable shortening ( I have an allergy to soy) I had to resort to my favorite this time (sorry Flo). But the balance of the ingredients remained the same. Flour, sugar (just a bit), salt, butter, and ice water. I let the crust chill overnight to insure optimal flakiness. Then I rolled out the dough cut circles and fit them into 4" tartlet pans. If you know me then you know I like individual size desserts (neater and more impressive when giving some away). The instructions required the shell to be fully cooked, or blind baked.
The next component is a caramel layer. For this the ingredients are: milk, butter, and heavy cream. Like most of the projects we bake technique is important and often it is as simple as keeping watch over a pot. I don't find that caramel is difficult unless I am not keeping a close vigil. There is a very fine line between just right and burnt when it comes to caramel. When the caramel has cooled for about 45 minutes pour a layer into the cooked shells, and let cool completely.
The real star of this show is the chocolate pudding. I used a Callebaut semi-sweet here along with the milk, egg yolk, sugar, corn starch, salt, butter, and vanilla. I think the most important step here is to pour the pudding through a fine sieve to insure a very smooth pudding. Covering the surface of the pudding with plastic wrap will prevent a skin from forming (believe me you do not want that on top of this little gem). It now needs to chill for 3-4 hours.
The next 2 components are the garnishes. I have the most wonderful toffee recipe so instead of purchasing toffee bits I made some. Here is my favorite, simple recipe for toffee:
1 stick of unsalted butter
1 cup sugar
1/2 tsp vanilla
1/4 tsp salt
1 cup almonds (or other nut), optional
Foil line a 12"x7" baking sheet. Arrange almonds evenly (or not) on the bottom. In a heavy saucepan combine butter, sugar, vanilla, & salt. Cook over medium high heat stirring constantly with a clean, dry wooden spoon until butter is melted. Continue cooking about 5 minutes or until candy is the color of unblanched almonds. Immediately and quickly pour candy, without scrapping the pot, over the prepared pan &/or nuts. Cool completely. Remove from foil, break into pieces and set aside.
Now back to Flo's recipe. The next and final component is a sweetened whipped cream. I know you can do this! Use heavy cream, powdered or granulated sugar, vanilla and some cognac or other brandy. Yum! When you are ready to serve top the pie or tartlets, as in my case with some whipped cream and sprinkle with some of the toffee bits.
Phew! Sounds like alot of work but, it really isn't if you do one component at a time and build the dessert up as you go. The end result is a very tasty, grown up dessert. Thank you Haana I had fun with this one!

Thursday, January 27, 2011

The Daring Bakers January 2011 Challenge!!!

The January 2011 Daring Bakers' challenge was hosted by Astheroshe of the blog accro. She chose to challenge everyone to make a Biscuit Joconde Imprime to wrap around an Entremets dessert. The real task here is to making the joconde wrap properly in a beautiful molded dessert presentation.
What is a joconde, you ask? Basically, it is the outside cake wrapper of a dessert. I've seen it before, admired it on other blogs but, never really knew how to do it. So this was my perfect chance to try my hand at it. My version of this dessert consists of several components: the joconde sponge and decor paste, chiffon cake base, mocha bavarian cream filling, and chocolate ganache topping. Yes, this is not something you do when pressed for time.
The first up was the decor paste. I chose to make a vertical stripe with the chocolate decor paste (not too creative the first time around). The ingredient list consisted of butter, powdered sugar, egg whites, cake flour, cocoa powder. This very thick batter is spread paper thin on a silpat. I used a pastry comb to make the vertical stripes. You can make squiggles with your fingers, zig zags, wood grain, dots, letters, or words. You can do this in chocolate as I did or tint the yellow version of the batter whatever color you want. My imagination is running wild for the next time...back to the task. The silpat is placed in the freezer to chill.
Next up is the joconde sponge. This calls for almond flour or meal, powdered sugar, cake flour, whole eggs and whites, sugar, and butter. This sponge is very much like the cake I use when doing a roulade cake. This is the easy part and the batter comes out light and fluffy. It spreads easily over the chilled paste design, then baked. Not bad so far, right? The cake is cooled approximately 15 minutes and inverted onto a powdered sugar parchment paper. The silpat is gently removed and wow! The cake is cut into 2" strips and used to line molds. This is where you can again be as creative as you wish. I used 3" PVC pipe cut to 3" high so that I would have individual sized desserts. There is enough joconde to make about 8 this size.
Then I made a speckled chocolate chiffon cake for a base. I cut the cake into a 1" layer and then used a 2.25" round cutter to cut disks. I pressed the disks carefully into the bottom of the ring. Next I prepared a silky Mocha Bavarian Cream (marthastewartweddings.com) for the filling. The recipe is as follows:
6tbs cold water
2 envelopes unflavored gelatin
2 cups milk chocolate-expresso creme anglaise, room temp
2 tsp coffee extract or instant expresso
3 cups heavy cream, whipped to medium peaks
Put the cold water into a heat proof bowl, and sprinkle with the gelatin. let soften 5 minutes.
Set bowl over a pan of simmering water, and whisk until dissolved. Add half the creme anglaise, and whisk to combine. Whisk in remaining creme anglaise, then coffee.
Chill until cooled over an ice bath or in the refrigerator until the mixture begins to thicken. Whisk in one-third of the whipped cream, then fold in the remaining cream in 2 batches. It is now ready to pipe or spoon into your molds. Please the molds into the refrigerator to set up completely.
Then I made a smooth chocolate ganache and poured it over the top of the dessert. Back in the refrigerator to set up.
This dessert is best served at room temperature. Don't let the number of steps scare you away. The nutty texture of the joconde is delightful. The look is simply elegant. Martha Stewart's bavarian cream is silky smooth delicious. The chocolate ganache melts in your mouth. This is a great dessert to test your skills and learn a new technique. Thank you Astheroshe for pushing me into something new.